Appearance
本篇探讨标签栏导航 TagsView 组件的开发,TagsView 组件滚动及固定的处理、组件缓存、右键菜单功能、重定向实现等。
定义 TagsView store
在 src/stores 下新建 tagsView.ts 文件,代码如下:
typescript
//src/stores/tagsView.ts
import {
  type RouteRecordName,
  type RouteLocationNormalizedLoadedGeneric,
} from "vue-router";
export const useTagsView = defineStore("tagsView", () => {
  // 存储已访问的视图列表
  const visitedViews = ref<RouteLocationNormalizedLoadedGeneric[]>([]);
  // 存储需要缓存的视图名称列表
  const cacheViews = ref<RouteRecordName[]>([]);
  // 添加视图到已访问视图列表和缓存视图列表中
  const addView = (view: RouteLocationNormalizedLoadedGeneric) => {
    const exits = visitedViews.value.some((v) => v.path === view.path);
    addCacheView(view); // 重新添加缓存视图以防止缓存被清除
    if (exits) return;
    const newView = {
      ...view,
      title: view.meta.title, // 设置页签标题
    };
    visitedViews.value.push(newView);
  };
  // 从已访问视图列表和缓存视图列表中删除指定视图
  const deleteView = (view: RouteLocationNormalizedLoadedGeneric) => {
    const index = visitedViews.value.findIndex((v) => v.path === view.path);
    if (index > -1) {
      visitedViews.value.splice(index, 1);
    }
    deleteCacheView(view);
  };
  // 添加视图名称到缓存视图列表中,除非视图不需要缓存
  const addCacheView = (view: RouteLocationNormalizedLoadedGeneric) => {
    if (cacheViews.value.includes(view.name)) return;
    if (!view.meta.noCache) {
      cacheViews.value.push(view.name);
    }
  };
  // 从缓存视图列表中删除指定视图名称
  const deleteCacheView = (view: RouteLocationNormalizedLoadedGeneric) => {
    const index = cacheViews.value.indexOf(view.name);
    if (index > -1) {
      cacheViews.value.splice(index, 1);
    }
  };
  // 删除所有非固定视图,并清空缓存视图列表
  const delAllView = () => {
    visitedViews.value = visitedViews.value.filter((view) => view.meta.affix);
    cacheViews.value = [];
  };
  // 删除除指定视图外的所有视图,并保留指定视图的缓存
  const deleteOtherView = (view: RouteLocationNormalizedLoadedGeneric) => {
    visitedViews.value = visitedViews.value.filter(
      (v) => v.meta.affix || v.path === view.path
    );
    cacheViews.value = cacheViews.value.filter((name) => name === view.name);
  };
  return {
    visitedViews,
    addView,
    deleteView,
    cacheViews,
    delAllView,
    deleteOtherView,
    deleteCacheView,
  };
});
重定向实现
在 src/views 下新建文件夹 redirect,新建文件 index.vue,代码如下:
html
//src/views/redirect/index.vue
<script lang="ts">
  export default {
    setup() {
      const route = useRoute();
      const router = useRouter();
      // 只是为了实现重定向功能
      router.replace({
        path: "/" + route.params.path,
        query: route.query,
      });
    },
    render() {
      return h("template");
    },
  };
</script>
在 src/router/index.ts 中配置重定向路由 redirect,代码如下:
typescript
//src/router/index.ts
import {
  createRouter,
  createWebHistory,
  type RouteRecordRaw,
} from "vue-router";
import Layout from "@/layout/index.vue";
export const constantRoutes: RouteRecordRaw[] = [
  {
    path: "/",
    component: Layout,
    redirect: "/dashboard",
    children: [
      {
        path: "dashboard",
        name: "dashboard",
        component: () => import("@/views/dashboard/index.vue"),
        meta: {
          icon: "ant-design:bank-outlined",
          title: "dashboard",
          affix: true, // 固定在tagsViews中
          noCache: true, //   不需要缓存
        },
      },
    ],
  },
  {
    path: "/redirect",
    component: Layout,
    meta: {
      hidden: true,
    },
    // 当跳转到  /redirect/a/b/c/d?query=1
    children: [
      {
        path: "/redirect/:path(.*)",
        component: () => import("@/views/redirect/index.vue"),
      },
    ],
  },
];
export const asyncRoutes: RouteRecordRaw[] = [
  {
    path: "/documentation",
    component: Layout,
    redirect: "/documentation/index",
    children: [
      {
        path: "index",
        name: "documentation",
        component: () => import("@/views/documentation/index.vue"),
        meta: {
          icon: "ant-design:database-filled",
          title: "documentation",
        },
      },
    ],
  },
  {
    path: "/guide",
    component: Layout,
    redirect: "/guide/index",
    children: [
      {
        path: "index",
        name: "guide",
        component: () => import("@/views/guide/index.vue"),
        meta: {
          icon: "ant-design:car-twotone",
          title: "guide",
        },
      },
    ],
  },
  {
    path: "/system",
    component: Layout,
    redirect: "/system/menu",
    meta: {
      icon: "ant-design:unlock-filled",
      title: "system",
      alwaysShow: true,
      // breadcrumb: false
      // 作为父文件夹一直显示
    },
    children: [
      {
        path: "menu",
        name: "menu",
        component: () => import("@/views/system/menu/index.vue"),
        meta: {
          icon: "ant-design:unlock-filled",
          title: "menu",
        },
      },
      {
        path: "role",
        name: "role",
        component: () => import("@/views/system/role/index.vue"),
        meta: {
          icon: "ant-design:unlock-filled",
          title: "role",
        },
      },
      {
        path: "user",
        name: "user",
        component: () => import("@/views/system/user/index.vue"),
        meta: {
          icon: "ant-design:unlock-filled",
          title: "user",
        },
      },
    ],
  },
  {
    path: "/external-link",
    component: Layout,
    children: [
      {
        path: "http://www.baidu.com",
        redirect: "/",
        meta: {
          icon: "ant-design:link-outlined",
          title: "link Baidu",
        },
      },
    ],
  },
];
// 需要根据用户赋予的权限来动态添加异步路由
export const routes = [...constantRoutes, ...asyncRoutes];
export default createRouter({
  routes, // 路由表
  history: createWebHistory(), //  路由模式
});
组件缓存处理
在 src/layout/components/Appmain.vue 中修改缓存相关配置,代码如下:
html
//src/layout/components/Appmain.vue
<template>
  <router-view v-slot="{ Component }">
    <transition name="fade">
      <keep-alive :include="inclueds">
        <component :is="Component" :key="$route.path"></component>
      </keep-alive>
    </transition>
  </router-view>
</template>
<script lang="ts" setup>
  import { useTagsView } from "@/stores/tagsView";
  const store = useTagsView();
  const inclueds = computed(() => store.cacheViews as string[]);
</script>
<style lang="scss">
  .fade-enter-active,
  .fade-leave-active {
    @apply transition-all duration-500 pos-absolute;
  }
  .fade-enter-from {
    @apply opacity-0 translate-x-[50px];
  }
  .fade-leave-to {
    @apply opacity-0 translate-x-[-50px];
  }
</style>
在 src/router/index.ts 中配置路由的 noCache 属性,定义组件是否需要缓存。

注意,需要缓存的组件中需要定义 name 属性,这样 include 才能正常工作。示例如下:
TagsView 组件开发
在 src/layout/components 下新建 TagsView 文件夹,新建文件 index.vue,在此进行 TagsView 组件滚动及固定的处理、右键菜单功能、重定向实现等。代码如下:
html
//src/layout/components/TagsView/index.vue
<template>
  <div class="tags-view-container">
    <el-scrollbar w-full whitespace-nowrap>
      <router-link
        class="tags-view-item"
        v-for="(tag, index) in visitedViews"
        :class="{
          active: isActive(tag)
        }"
        :key="index"
        :to="{ path: tag.path, query: tag.query }"
      >
        <el-dropdown
          placement="top-start"
          trigger="contextmenu"
          @command="(command) => handleCommand(command, tag)"
        >
          <span leading-28px class="title">{{ (tag as any).title }}</span>
          <template #dropdown>
            <el-dropdown-menu>
              <el-dropdown-item command="all">关闭所有</el-dropdown-item>
              <el-dropdown-item command="other">关闭其他</el-dropdown-item>
              <el-dropdown-item command="self" v-if="!tag.meta.affix"
                >关闭</el-dropdown-item
              >
              <el-dropdown-item command="refresh">刷新</el-dropdown-item>
            </el-dropdown-menu>
          </template>
        </el-dropdown>
        <svg-icon
          v-if="!isAffix(tag)"
          icon-name="ant-design:close-circle-outlined"
          mx-2px
          @click.prevent="closeSelectedTag(tag)"
        ></svg-icon>
      </router-link>
    </el-scrollbar>
  </div>
</template>
<script lang="ts" setup>
  import { useTagsView } from "@/stores/tagsView";
  import type {
    RouteLocationNormalizedGeneric,
    RouteRecordRaw,
  } from "vue-router";
  import { join } from "path-browserify";
  import { routes } from "@/router/index"; //从应用的路由配置文件中导入了所有的路由定义
  const store = useTagsView();
  const { deleteView, addView, delAllView, deleteOtherView, deleteCacheView } =
    store;
  //  必须采用storeToRefs 进行解构出来,否则会丧失响应式
  const { visitedViews } = storeToRefs(store);
  /*
useRouter 创建了一个 router 实例,该实例用于程序化的导航。
useRouter 是 Vue Router 提供的组合式 API,用于在组件中操作路由。
有了 router 实例,组件可以调用 router.push、router.replace 等方法来导航到不同的页面或视图。
*/
  const router = useRouter();
  /*
useRoute 创建了一个 route 实例,该实例包含了当前路由的信息。
useRoute 是 Vue Router 提供的组合式 API,用于在组件中获取当前路由的详细信息。
route 对象包含了当前路由的路径、名称、查询参数等信息,组件可以利用这些信息来判断当前活动的标签页、或者执行一些路由相关的逻辑操作。
*/
  const route = useRoute();
  // 判断当前路由是否激活状态
  const isActive = (tag: RouteLocationNormalizedGeneric) => {
    return tag.path === route.path;
  };
  // 判断标签是否为可关闭状态
  function isAffix(tag: RouteLocationNormalizedGeneric) {
    return tag.meta.affix;
  }
  // 添加当前路由到标签视图
  const addTags = () => {
    if (route.name) {
      // 需要添加到tags中
      addView(route);
    }
  };
  // 导航到最后一个标签视图
  const toLastView = () => {
    const lastView = visitedViews.value[visitedViews.value.length - 1];
    if (lastView) {
      router.push(lastView.path);
    } else {
      router.push("/");
    }
  };
  // 关闭选中的标签视图
  const closeSelectedTag = (tag: RouteLocationNormalizedGeneric) => {
    // ...
    deleteView(tag);
    if (isActive(tag)) {
      // 如果删掉了自己,需要导航到当前list中的最后一个
      toLastView();
    }
  };
  //  此方法用于计算 哪些tag应该默认展示在列表中
  function filterAffix(routes: RouteRecordRaw[], basePath = "/") {
    const tags: RouteLocationNormalizedGeneric[] = [];
    for (let route of routes) {
      if (route.meta?.affix) {
        tags.push({
          name: route.name,
          path: join(basePath, route.path),
          meta: route.meta,
        } as RouteLocationNormalizedGeneric);
      }
      if (route.children) {
        tags.push(...filterAffix(route.children, route.path));
      }
    }
    return tags;
  }
  // 初始化标签视图,添加固定标签和当前路由标签
  const initTags = () => {
    const filterAffixTags = filterAffix(routes);
    filterAffixTags.forEach((tag) => {
      //添加固定标签
      addView(tag);
    });
    //添加当前路由标签
    addTags();
  };
  // 页面加载后 需要初始化固定 + 默认当前路径的
  onMounted(() => {
    initTags();
  });
  //  路径变化时重新添加
  watch(() => route.path, addTags);
  // 点击菜单
  const enum CommandType {
    All = "all",
    Other = "other",
    Self = "self",
    Refresh = "refresh",
  }
  // 处理菜单命令
  const handleCommand = (
    command: CommandType,
    view: RouteLocationNormalizedGeneric
  ) => {
    switch (command) {
      case CommandType.All:
        delAllView();
        break;
      case CommandType.Other:
        deleteOtherView(view);
        if (!isActive(view)) {
          router.push(view.path);
        }
        break;
      case CommandType.Self:
        closeSelectedTag(view);
        break;
      case CommandType.Refresh:
        // 如果本次路径和上次路径相同,刷新会没有效果
        // 解决方法:跳转到专门做刷新的一个路由,在通过这个路由回来即可
        deleteCacheView(view);
        router.push("/redirect" + view.path);
        break;
    }
  };
</script>
<style scoped>
  .tags-view-container {
    @apply w-full overflow-hidden  @apply h-[var(--tagsview-height)] shadow-sm shadow-gray-300 bg-gray-100;
  }
  .tags-view-item {
    @apply inline-block h-28px leading-28px  px-3px mx-3px  text-black mt-1 bg-gray-300;
    &.active {
      @apply text-white border-none bg-green;
      .title {
        @apply text-white;
      }
      &::before {
        content: "";
        @apply inline-block w-8px h-8px rounded-full  bg-white mr-3px;
      }
    }
  }
</style>
页面引入
在 src/layout/components/index.vue 中引入 TagsView 组件,代码如下:
html
//src/layout/components/index.vue
<template>
  <div class="app-wrapper">
    <div class="sidebar-container">
      <sidebar></sidebar>
    </div>
    <div class="main-container">
      <div class="header">
        <!--  上边包含收缩的导航条 -->
        <navbar></navbar>
        <tags-view></tags-view>
      </div>
      <div class="app-main">
        <app-main></app-main>
      </div>
    </div>
  </div>
</template>
<style lang="scss" scoped>
  .app-wrapper {
    @apply flex w-full h-full;
    .sidebar-container {
      // 跨组件设置样式
      @apply bg-[var(--menu-bg)];
      :deep(.sidebar-container-menu:not(.el-menu--collapse)) {
        @apply w-[var(--sidebar-width)];
      }
    }
    .main-container {
      @apply flex flex-col flex-1;
    }
    .header {
      @apply h-84px;
      .navbar {
        @apply h-[var(--navbar-height)] bg-yellow;
      }
      .tags-view {
        @apply h-[var(--tagsview-height)] bg-blue;
      }
    }
    .app-main {
      @apply bg-cyan;
      min-height: calc(100vh - var(--tagsview-height) - var(--navbar-height));
    }
  }
</style>
npm run dev 启动后,页面效果如下:
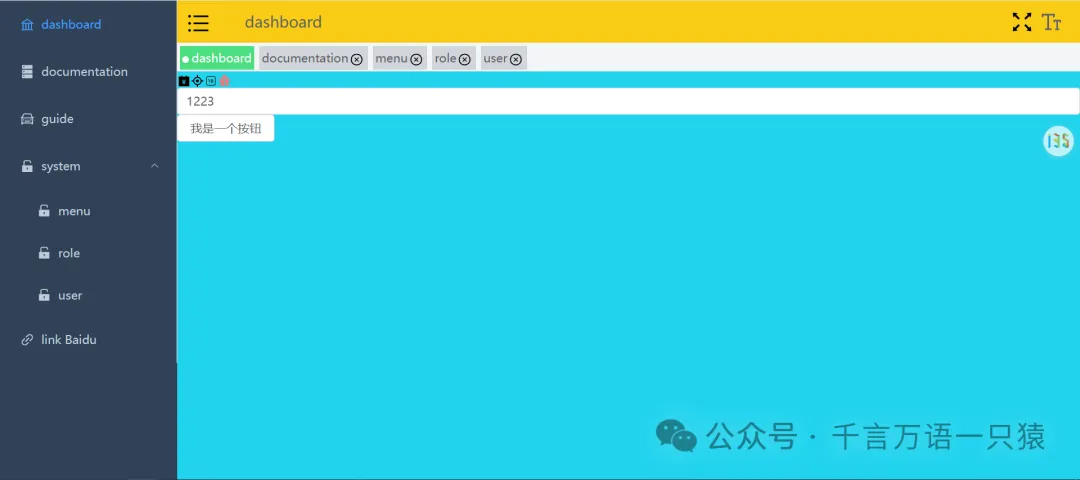
以上,TagsView 组件就开发完成了。