Appearance
元素的属性和特性
前面我们已经学习了如何获取节点,以及节点通常所包含的属性,接下来我们来仔细研究元素 Element。
我们知道,一个元素除了有开始标签、结束标签、内容之外,还有很多的属性(attribute)
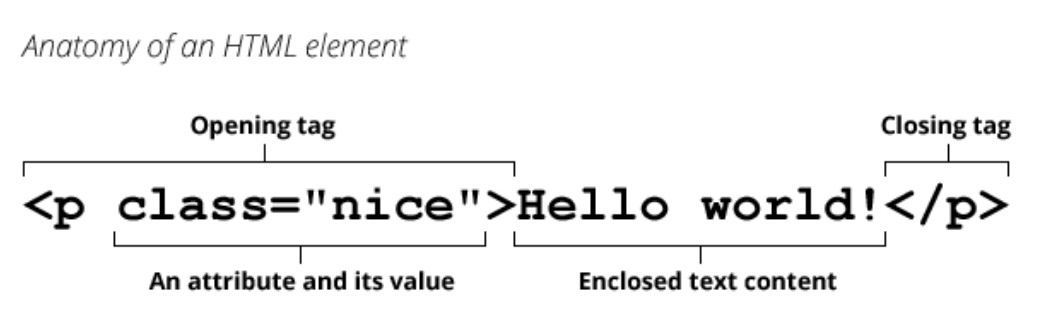
浏览器在解析 HTML 元素时,会将对应的 attribute 也创建出来放到对应的元素对象上。
- 比如 id、class 就是全局的 attribute,会有对应的 id、class 属性;
- 比如 href 属性是针对 a 元素的,type、value 属性是针对 input 元素的;
接下来我们学习一下如何获取和设置这些属性。
attribute 的分类
属性 attribute 的分类:
- 标准的 attribute:某些 attribute 属性是标准的,比如 id、class、href、type、value 等;
- 非标准的 attribute:某些 attribute 属性是自定义的,比如 abc、age、height 等;
html
<!-- 属性: attribute(特性) -->
<!--
attribute的分类:
1.如果是HTML标准制定的attribute, 称之为标准Attribute
2.而自定义的Attribute, 称之为非标准Attribute
-->
<div id="abc" class="box" title="box" age="18" height="1.88">我是box</div>
<a href="https://www.baidu.com">百度一下</a>
attribute 的操作
对于所有的 attribute 访问都支持如下的方法:
- elem.hasAttribute(name) — 检查特性是否存在。
- elem.getAttribute(name) — 获取这个特性值。
- elem.setAttribute(name, value) — 设置这个特性值。
- elem.removeAttribute(name) — 移除这个特性。
- attributes:attr 对象的集合,具有 name、value 属性。
attribute 具备以下特征:
- 它们的名字是大小写不敏感的(id 与 ID 相同)。
- 它们的值总是字符串类型的。
html
<div id="abc" class="box" title="box" age="18" height="1.88">我是box</div>

<input type="checkbox" checked="checked" />
javascript
var boxEl = document.querySelector(".box");

// 1.所有的attribute都支持的操作
console.log(
  boxEl.hasAttribute("AGE"),
  boxEl.hasAttribute("abc"),
  boxEl.hasAttribute("id")
); // true false true
console.log(
  boxEl.getAttribute("AGE"),
  boxEl.getAttribute("abc"),
  boxEl.getAttribute("id")
); // 18 null abc

boxEl.setAttribute("id", "cba"); // id变成cba
boxEl.removeAttribute("id"); // id没了

var boxAttributes = boxEl.attributes;
for (var attr of boxAttributes) {
  console.log(attr.name, attr.value);
}

// 2.通过getAttribute()一定是字符串类型
var inputEl = document.querySelector("input");
console.log(inputEl.getAttribute("checked")); // checked
元素的属性(property)
html
<!-- 元素中的属性称之为attribute -->
<!-- 标准的attribute在对应的对象模型中都有对应的property -->
<div id="abc" class="box" title="标题" age="18" height="1.88">我是box</div>

<input type="checkbox" checked />

账号: <input class="account" type="text" />
<button class="btn">设置input的值</button>
对于标准的 attribute,会在 DOM 对象上创建与其对应的 property 属性:
javascript
// 1.通过property获取attribute的值
// 获取box元素
var boxEl = document.querySelector(".box");
console.log(boxEl.id, boxEl.title, boxEl.age, boxEl.height); // abc 标题 undefined undefined
在大多数情况下,它们是相互作用的
- 改变 property,通过 attribute 获取的值,会随着改变;
- 通过 attribute 操作修改,property 的值会随着改变;
- 但是 input 的 value 修改只能通过 attribute 的方法;
除非特别情况,大多数情况下,设置、获取 attribute,推荐使用 property 的方式:
这是因为它默认情况下是有类型的;
javascript
// input元素
var inputEl = document.querySelector("input");
// if (inputEl.getAttribute("checked")) {
//   console.log("checkbox处于选中状态")
// }
if (inputEl.checked) {
  // true
  console.log("checkbox处于选中状态");
}
console.log(typeof inputEl.checked); // boolean

// 2.attribute和property是相互影响的
boxEl.id = "aaaaa";
console.log(boxEl.getAttribute("id"));

boxEl.setAttribute("title", "哈哈哈");
console.log(boxEl.title);

// 3.比较特殊的情况, input设置值(了解)
var accountInputEl = document.querySelector(".account");
var btnEl = document.querySelector(".btn");
btnEl.onclick = function () {
  accountInputEl.setAttribute("value", "kobe");
  // 优先级更高
  accountInputEl.value = "coderwhy";
};
JavaScript 动态修改样式
有时候我们会通过 JavaScript 来动态修改样式,这个时候我们有两个选择:
- 选择一:在 CSS 中编写好对应的样式,动态的添加 class;
- 选择二:动态的修改 style 属性;
开发中如何选择呢?
在大多数情况下,如果可以动态修改 class 完成某个功能,更推荐使用动态 class;
如果对于某些情况,无法通过动态修改 class(比如精准修改某个 css 属性的值),那么就可以修改 style 属性;
html
<div class="box">我是box</div>如果想将 box 字体改为红色,大小改为 24px,背景为绿色,一种做法是直接修改 style
javascript
// 1.获取boxEl
var boxEl = document.querySelector(".box");

// 2.监听点击
boxEl.onclick = function () {
  // 1.直接修改style
  boxEl.style.color = "red";
  boxEl.style.fontSize = "24px";
  boxEl.style.backgroundColor = "green";
};
但是这种做法不好维护,可以采用添加 class 的方法
javascript
// 1.获取boxEl
var boxEl = document.querySelector(".box");

// 2.监听点击
boxEl.onclick = function () {
  // 2.动态的添加某一个class
  boxEl.className = "active";
};
css
.active {
  color: red;
  font-size: 24px;
  background-color: green;
}
如果想要精准的修改 css 属性的值,那么得使用 style,动态添加的 class 样式是写死的,没法改
javascript
// 1.获取boxEl
var boxEl = document.querySelector(".box");

// 2.监听点击
var counter = 1;
boxEl.onclick = function () {
  // 3.动态的修改boxEl的宽度,每点击一次宽度加100px
  boxEl.style.width = 100 * counter + "px";
  counter++;
};
元素的 className 和 classList
html
<div class="box">我是box</div>元素的 class attribute,对应的 property 并非叫 class,而是 className:
- 这是因为 JavaScript 早期是不允许使用 class 这种关键字来作为对象的属性,所以 DOM 规范使用了 className;
- 虽然现在 JavaScript 已经没有这样的限制,但是并不推荐,并且依然在使用 className 这个名称;
我们可以对 className 进行赋值,它会替换整个类中的字符串。
javascript
var boxEl = document.querySelector(".box");

// 1.方法一: className
boxEl.className = "abc"; // class会替换成abc
如果我们需要添加或者移除单个的 class,那么可以使用 classList 属性。
elem.classList 是一个特殊的对象:
- elem.classList.add (class) :添加一个类
- elem.classList.remove(class):添加/移除类。
- elem.classList.toggle(class) :如果类不存在就添加类,存在就移除它。
- elem.classList.contains(class):检查给定类,返回 true/false。
classList 是可迭代对象,可以通过 for of 进行遍历。
html
<div class="box">我是box</div>
<button class="btn">切换</button>
css
.active {
  color: #fff;
  background-color: #f80;
  font-size: 25px;
}
javascript
var boxEl = document.querySelector(".box");

// 2.方法二: classList操作class
boxEl.classList.add("abc");
boxEl.classList.add("active");
boxEl.classList.remove("abc");

// 需求: box在active之间切换
var btnEl = document.querySelector(".btn");
btnEl.onclick = function () {
  // 方法一:
  // if (boxEl.classList.contains("active")) {
  //   boxEl.classList.remove("active")
  // } else {
  //   boxEl.classList.add("active")
  // }
  // 方法二:
  boxEl.classList.toggle("active");
};
元素的 style 属性
html
<div class="box" style="background-color: aqua; color: white;">我是box</div>如果需要单独修改某一个 CSS 属性,那么可以通过 style 来操作:
对于多词(multi-word)属性,使用驼峰式 camelCase
javascript
var boxEl = document.querySelector(".box");

// 1.在property中使用的驼峰格式
console.log(boxEl.style.backgroundColor);
如果我们将值设置为空字符串,那么会使用 CSS 的默认样式:
javascript
// 2.如果将一个属性的值, 设置为空的字符串, 那么是使用默认值
boxEl.style.display = "";
boxEl.style.fontSize = "";
多个样式的写法,我们需要使用 cssText 属性:
不推荐这种用法,因为它会替换整个字符串;
javascript
// 3.设置多个样式
// boxEl.style.fontSize = "30px"
// boxEl.style.color = "red"
boxEl.style.cssText = "font-size: 30px; color: red;";
元素 style 的读取 - getComputedStyle
html
<div class="box" style="background-color: red;">我是box</div>css
.box {
  font-size: 20px;
}
如果我们需要读取样式:
- 对于内联样式,是可以通过 style.*的方式读取到的;
- 对于 style、css 文件中的样式,是读取不到的;
javascript
var boxEl = document.querySelector(".box");
console.log(boxEl.style.backgroundColor); // 可以读取到
console.log(boxEl.style.fontSize); // 读取不到
这个时候,我们可以通过 getComputedStyle 的全局函数来实现:
javascript
console.log(getComputedStyle(boxEl).fontSize);HTML5 的 data-*自定义属性
前面我们有学习 HTML5 的 data-*自定义属性,那么它们也是可以在 dataset 属性中获取到的:
HTML
<div id="abc" class="box"
       data-age="18" data-height="1.88"></div>
javascript
var boxEl = document.querySelector(".box");
// 小程序开发中使用
console.log(boxEl.dataset.age);
console.log(boxEl.dataset.height);
创建元素
前面我们使用过 document.write 方法写入一个元素:
- 这种方式写起来非常便捷,但是对于复杂的内容、元素关系拼接并不方便;
- 它是在早期没有 DOM 的时候使用的方案,目前依然被保留了下来;
那么目前我们想要插入一个元素,通常会按照如下步骤:
- 步骤一:创建一个元素;
- 步骤二:插入元素到 DOM 的某一个位置;
创建元素: document.createElement(tag)
javascript
// 1.通过innerHTML(不推荐)
// boxEl.innerHTML = `
//   <h2 class="title">我是标题</h2>
// `

// 2.真实创建一个DOM对象
var h2El = document.createElement("h2");
h2El.className = "title";
h2El.classList.add("active");
h2El.textContent = "我是标题";
插入元素
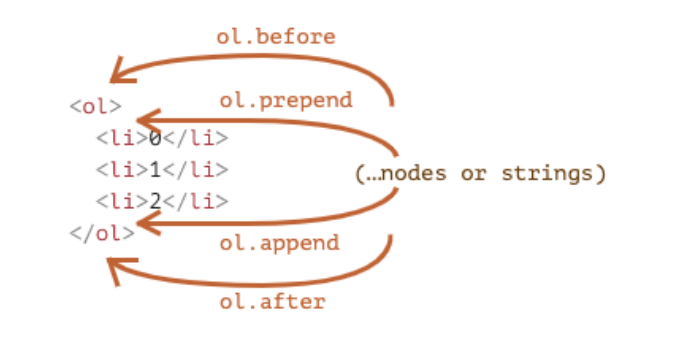
插入元素的方式如下:
- node.append(...nodes or strings) —— 在 node 末尾 插入节点或字符串
- node.prepend(...nodes or strings) —— 在 node 开头 插入节点或字符串
- node.before(...nodes or strings) —— 在 node 前面 插入节点或字符串
- node.after(...nodes or strings) —— 在 node 后面 插入节点或字符串
- node.replaceWith(...nodes or strings) —— 将 node 替换为给定的节点或字符串
html
<span>111111</span>

<div class="box">
  <span class="box-first">呵呵呵呵</span>
  <p>哈哈哈哈哈</p>
</div>
javascript
var boxEl = document.querySelector(".box");

// 插入到span和p元素之间
// var spanEl = document.querySelector("span")
// var spanEl = boxEl.children[0]
var spanEl = boxEl.querySelector("span");

spanEl.after(h2El);
移除和克隆元素
移除元素我们可以调用元素本身的 remove 方法:
html
<button class="remove-btn">移除box</button>

<div class="box">
  <h2>我是标题</h2>
  <p>我是文本, 哈哈哈哈哈</p>
</div>
javascript
// 1.获取元素
var boxEl = document.querySelector(".box");
var removeBtnEl = document.querySelector(".remove-btn");

// 2.监听removeBtn的点击
removeBtnEl.onclick = function () {
  boxEl.remove();
};
如果我们想要复制一个现有的元素,可以通过 cloneNode 方法:
- 可以传入一个 Boolean 类型的值,来决定是否是深度克隆;
- 深度克隆会克隆对应元素的子元素,否则不会
html
<button class="clone-btn">复制box</button>

<div class="box">
  <h2>我是标题</h2>
  <p>我是文本, 哈哈哈哈哈</p>
</div>
javascript
// 1.获取元素
var boxEl = document.querySelector(".box");
var cloneBtnEl = document.querySelector(".clone-btn");
javascript
// 3.复制box
var counter = 0;
cloneBtnEl.onclick = function () {
  var newNode = boxEl.cloneNode(true);
  newNode.children[0].textContent = "我是标题" + counter;
  // boxEl.after(newNode)
  document.body.append(newNode);

  counter++;
};旧的元素操作方法(了解)
在很多地方我们也会看到一些旧的操作方法:
parentElem.appendChild(node):在 parentElem 的父元素最后位置添加一个子元素
parentElem.insertBefore(node, nextSibling):在 parentElem 的 nextSibling 前面插入一个子元素
parentElem.replaceChild(node, oldChild):在 parentElem 中,新元素替换之前的 oldChild 元素
parentElem.removeChild(node):在 parentElem 中,移除某一个元素
全局变量的使用细节
点击+按钮加 1,点击-按钮减 1
html
<button class="add">+</button>
<button class="sub">-</button>
<h2 class="counter">0</h2>
javascript
// 1.获取按钮
var addEl = document.querySelector(".add");
var subEl = document.querySelector(".sub");
var h2El = document.querySelector(".counter");

// 2.监听btnEl的点击
var counter = 0;
addEl.onclick = function () {
  counter++;
  h2El.textContent = counter;
};
subEl.onclick = function () {
  counter--;
  h2El.textContent = counter;
};
元素的大小、滚动
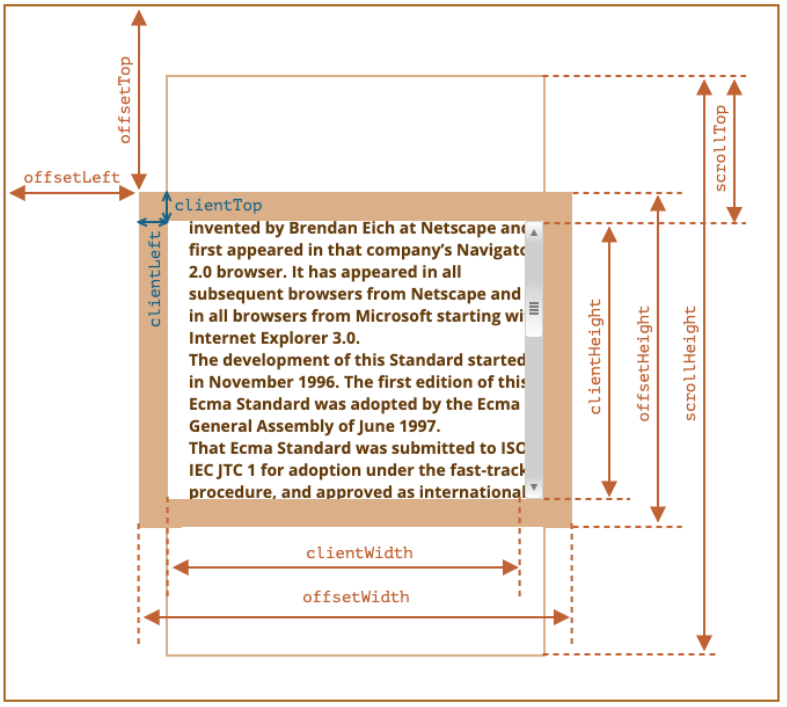
clientWidth:contentWith+padding(不包含滚动条)
clientHeight:contentHeight+padding
clientTop:border-top 的宽度
clientLeft:border-left 的宽度
offsetWidth:元素完整的宽度
offsetHeight:元素完整的高度
offsetLeft:距离父元素的 x
offsetHeight:距离父元素的 y
scrollHeight:整个可滚动的区域高度
scrollTop:滚动部分的高度
html
<div class="box">
  你去过国内最美的地方是哪#
  我去过国内最美的地方是新疆喀纳斯。喀纳斯是一个美丽而神秘的地方,这里群山环抱,森林密布,湖水清澈,风景奇特。为国家级5A级景区,国家地质公园,国家森林公园。
</div>
css
body {
  padding: 100px;
}

.box {
  width: 100px;
  height: 100px;
  padding: 20px;
  border: 10px solid red;
  /* box-sizing: border-box; */
  background-color: orange;

  overflow: auto;
}
javascript
var boxEl = document.querySelector(".box");

// 1.获取样式(局限性很强)
// var boxStyle = getComputedStyle(boxEl)
// console.log(boxStyle.width, boxStyle.height)

// 2.获取更多信息
console.log(boxEl.clientWidth);
console.log(boxEl.clientHeight);

console.log(boxEl.clientLeft);
console.log(boxEl.clientTop);

console.log(boxEl.offsetWidth);
console.log(boxEl.offsetHeight);

console.log(boxEl.offsetLeft);
console.log(boxEl.offsetTop);

console.log(boxEl.scrollHeight);
console.log(boxEl.scrollTop);

// window对象
window.onclick = function () {
  console.log(boxEl.scrollTop); // 先滚动,然后点击window获取滚动的距离
};
window 的大小、滚动
window 的 width 和 height
innerWidth、innerHeight:获取 window 窗口的宽度和高度(包含滚动条)
outerWidth、outerHeight:获取 window 窗口的整个宽度和高度(包括调试工具、工具栏)
documentElement.clientHeight、documentElement.clientWidth:获取 html 的宽度和高度(不包含滚动条)
javascript
// window大小
console.log(window.outerWidth);
console.log(window.outerHeight);

console.log(window.innerWidth);
console.log(window.innerHeight);

console.log(document.documentElement.offsetWidth);
console.log(document.documentElement.offsetHeight);
window 的滚动位置:
scrollX:X 轴滚动的位置(别名 pageXOffset)
scrollY:Y 轴滚动的位置(别名 pageYOffset)
javascript
// 获取window的滚动区域
window.onclick = function () {
  console.log(window.scrollX);
  console.log(window.scrollY);
};
也有提供对应的滚动方法:
方法 scrollBy(x,y) :将页面滚动至 相对于当前位置的 (x, y) 位置
方法 scrollTo(pageX,pageY) 将页面滚动至 绝对坐标
javascript
scrollBtnEl.onclick = function () {
  window.scrollBy(0, 100); // 在原先基础上增加100,每次点击y都会增加100
};
下面来完成一个需求,当滚动 y 方向的距离超过 600 时,显示回到顶部按钮,否则隐藏该按钮。
加很多 br 是为了让 y 方向有滚动条
html
<div class="box"></div>
<button class="scroll-btn">回到顶部</button>

<br /><br /><br /><br /><br /><br /><br /><br /><br /><br /><br /><br /><br /><br /><br /><br /><br /><br /><br /><br /><br />
<br /><br /><br /><br /><br /><br /><br /><br /><br /><br /><br /><br /><br /><br /><br /><br /><br /><br /><br /><br /><br />
<br /><br /><br /><br /><br /><br /><br /><br /><br /><br /><br /><br /><br /><br /><br /><br /><br /><br /><br /><br /><br />
<br /><br /><br /><br /><br /><br /><br /><br /><br /><br /><br /><br /><br /><br /><br /><br /><br /><br /><br /><br /><br />
<br /><br /><br /><br /><br /><br /><br /><br /><br /><br /><br /><br /><br /><br /><br /><br /><br /><br /><br /><br /><br />
方法一:
使用 display 来控制显示和隐藏
css
.scroll-btn {
  position: fixed;
  right: 20px;
  bottom: 20px;
  display: none; // 开始先隐藏
}
javascript
var scrollBtnEl = document.querySelector(".scroll-btn");

window.onscroll = function () {
  var scrollY = window.scrollY;
  if (scrollY > 600) {
    scrollBtnEl.style.display = "block";
  } else {
    scrollBtnEl.style.display = "none";
  }
};

// 点击按钮后滚动到某个位置
scrollBtnEl.onclick = function () {
  window.scrollTo(0, 0); // 回到顶部
};
方法二:
使用 hidden 来控制显示和隐藏
css
.scroll-btn {
  position: fixed;
  right: 20px;
  bottom: 20px;
}
javascript
var scrollBtnEl = document.querySelector(".scroll-btn");
scrollBtnEl.hidden = true; // 开始先隐藏
window.onscroll = function () {
  var scrollY = window.scrollY;
  if (scrollY > 600) {
    scrollBtnEl.hidden = false;
  } else {
    scrollBtnEl.hidden = true;
  }
};

// 点击按钮后滚动到某个位置
scrollBtnEl.onclick = function () {
  window.scrollTo(0, 0);
};
案例的练习-动态输入列表
一直往 ul 中插入 li,直到输入为空停止
html
<h1>动态创建列表</h1>
<ul class="list"></ul>
javascript
var ulEl = document.querySelector(".list");

var isFlag = true;
while (isFlag) {
  var message = prompt("请输入信息:");
  if (!message) {
    // 没有输入内容
    isFlag = false;
  } else {
    var liEl = document.createElement("li");
    liEl.textContent = message;
    ulEl.append(liEl);
  }
}
案例的练习-动态显示时间
html
<h1 class="time">2022-05-19 11:14:30</h1>javascript
// 封装了工具函数
// 对月份那些进行转换,比如1月转成01,count是传入的位数,不传默认是2位,padStr表示用什么补齐
function padLeft(content, count, padStr) {
  count = count || 2;
  padStr = padStr || "0";

  content = String(content);
  return content.padStart(count, padStr);
}

// 1.获取时间的元素
var timeEl = document.querySelector(".time");

setInterval(function () {
  // 2.获取具体的时间并且进行格式化
  var date = new Date();
  var year = date.getFullYear();
  var month = padLeft(date.getMonth() + 1);
  var day = padLeft(date.getDate());
  var hour = padLeft(date.getHours());
  var minute = padLeft(date.getMinutes());
  var second = padLeft(date.getSeconds());

  // 3.将时间放到timeEl中
  timeEl.textContent = `${year}-${month}-${day} ${hour}:${minute}:${second}`;
}, 1000);
案例练习-倒计时的显示
html
<div class="countdown">
  <span class="time hour">03</span>
  <span class="split">:</span>
  <span class="time minute">25</span>
  <span class="split">:</span>
  <span class="time second">43</span>
</div>
css
.countdown {
  color: #f00;
  font-size: 20px;
}

.countdown .time {
  background-color: #f00;
  color: #fff;
  display: inline-block;
  padding: 5px;
  border-radius: 3px;
}
javascript
// 封装了工具函数
function formatPadLeft(content, count, padStr) {
  count = count || 2;
  padStr = padStr || "0";

  content = String(content);
  return content.padStart(count, padStr);
}
// 1.获取元素
var hourEl = document.querySelector(".hour");
var minuteEl = document.querySelector(".minute");
var secondEl = document.querySelector(".second");

var endDate = new Date();
endDate.setHours(24);
endDate.setMinutes(0);
endDate.setSeconds(0);
endDate.setMilliseconds(0);

setInterval(function () {
  // 获取倒计时的小时-分钟-秒钟
  // 11:53:22 => 24:00:00
  var nowDate = new Date();
  var intervalTime = Math.floor((endDate.getTime() - nowDate.getTime()) / 1000);
  // console.log(intervalTime)

  // 43324: x小时x分钟x秒钟
  var hour = Math.floor(intervalTime / 3600);
  var minute = Math.floor(intervalTime / 60) % 60;
  var second = intervalTime % 60;

  // 2.设置内容
  hourEl.textContent = formatPadLeft(hour);
  minuteEl.textContent = formatPadLeft(minute);
  secondEl.textContent = formatPadLeft(second);
}, 1000);