Appearance
window 定时器方法
有时我们并不想立即执行一个函数,而是等待特定一段时间之后再执行,我们称之为“计划调用(scheduling a call)”。
目前有两种方式可以实现:
- setTimeout 允许我们将函数推迟到一段时间间隔之后再执行。
- setInterval 允许我们重复运行一个函数,从一段时间间隔之后开始运行,之后以该时间间隔连续重复运行该函数。
并且通常情况下有提供对应的取消方法:
- clearTimeout:取消 setTimeout 的定时器;
- clearInterval:取消 setInterval 的定时器;
大多数运行环境都有内置的调度程序,并且提供了这些方法:
目前来讲,所有浏览器以及 Node.js 都支持这两个方法;
所以我们后续学习 Node 的时候,也可以在 Node 中使用它们;
setTimeout 的使用
setTimeout 的语法如下:
javascript
let timerId = setTimeout(func|code, [delay], [arg1], [arg2], ...)func|code:想要执行的函数或代码字符串。
一般传入的都是函数,由于某些历史原因,支持传入代码字符串,但是不建议这样做;
delay:执行前的延时,以毫秒为单位(1000 毫秒 = 1 秒),默认值是 0;
arg1,arg2…:要传入被执行函数(或代码字符串)的参数列表;
clearTimeout 方法:
setTimeout 在调用时会返回一个“定时器标识符(timer identifier)”,我们可以使用它来取消执行。
html
<button class="out">取消setTimeout定时器</button>javascript
// 1.setTimeout
function foo(name, age, height) {
  console.log("foo被调用----", name, age, height);
}
var timeoutID = setTimeout(foo, 3000, "why", 18, 1.88);

var timeoutBtn = document.querySelector(".out");
timeoutBtn.onclick = function () {
  // 取消调度
  clearTimeout(timeoutID);
};
setInterval 的使用
setInterval 方法和 setTimeout 的语法相同:
javascript
let timerId = setInterva;(func|code, [delay], [arg1], [arg2], ...)所有参数的意义也是相同的;
不过与 setTimeout 只执行一次不同,setInterval 是每间隔给定的时间周期性执行;
clearInterval 方法:
setInterval 也会返回一个“定时器标识符(timer identifier)”,我们可以通过 clearInterval 来取消这个定时器。
关于定时器还有一些宏任务相关的概念,我们会在 JavaScript 高级中讲解。
html
<button class="itv">取消setInterval定时器</button>javascript
function bar() {
  console.log("bar被调用++++");
}

var itvID = setInterval(bar, 3000);

var itvBtn = document.querySelector(".itv");
itvBtn.onclick = function () {
  clearInterval(itvID);
};
案例实战一 – 轮播消息提示
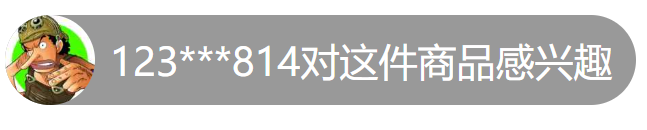
每隔三秒切换轮播消息提示
html
<div class="tip-bar">
  <img
    src="https://bfs.biyao.com/group1/M01/A2/67/rBACVGA_iOuAYaTxAAAPbted3yE165.png"
    alt=""
  />
  <span>183***138对这件商品感兴趣</span>
</div>
css
.tip-bar {
  display: inline-flex;
  align-items: center;
  height: 30px;
  background-color: rgba(0, 0, 0, 0.4);
  border-radius: 16px;
}
img {
  width: 30px;
  height: 30px;
  border-radius: 50%;
  margin-right: 5px;
}
span {
  font-size: 13px;
  color: white;
  margin-right: 8px;
}
javascript
// 1.从服务器拿到数据ajax/fetch请求
let tipList = [
  {
    icon: "https://bfs.biyao.com/group1/M01/A6/97/rBACYWBCHqyAFH5tAAANZXX5Eww646.png",
    title: "coderwhy对这件商品感兴趣",
  },
  {
    icon: "https://bfs.biyao.com/group1/M01/A2/67/rBACVGA_iOuAYaTxAAAPbted3yE165.png",
    title: "123***814对这件商品感兴趣",
  },
  {
    icon: "https://bfs.biyao.com/group1/M00/7F/4E/rBACYV16HseAP-PnAAAW9bbVoKE463.png",
    title: "刘军对这件商品感兴趣",
  },
];

// 2.动态的切换数据
// 2.1.获取元素
var tipBar = document.querySelector(".tip-bar");
var imgEl = tipBar.querySelector("img");
var spanEl = tipBar.querySelector("span");

// 2.2.3s切换一次数据
var currentIndex = 0; // 记录当前展示到的索引位置
setInterval(function () {
  // 1> 根据索引获取item
  var tipItem = tipList[currentIndex];

  // 2> 给DOM设置内容
  imgEl.src = tipItem.icon;
  spanEl.textContent = tipItem.title;

  // 3> 重新计算索引
  currentIndex++;
  if (currentIndex === tipList.length) {
    currentIndex = 0;
  }
}, 3000);

// 随机
// Math.floor(Math.random() * tipList.length)
案例实战二 – 关闭隐藏消息
点击 x 按钮整个移除

html
<div class="top-bar">
  <div class="delete">
    <img src="./img/delete.png" alt="" />
  </div>
  <img class="logo" src="./img/logo.png" alt="" />
  <span>打开京东App,购物更轻松</span>
  <div class="btn">立即打开</div>
</div>
css
.top-bar {
  display: flex;
  flex-direction: row;
  align-items: center;
  height: 45px;
  width: 375px;
  background-color: black;
  /* 关键 */
  overflow: hidden;
  transition: all 0.3s ease-out;
}
.delete {
  display: flex;
  flex-direction: row;
  justify-content: center;
  align-items: center;
  height: 100%;
  width: 30px;
  cursor: pointer;
}
.delete img {
  height: 10px;
  width: 10px;
}
.logo {
  height: 30px;
  width: 30px;
  margin-left: 3px;
  margin-right: 30px;
  cursor: pointer;
}
span {
  color: white;
  font-size: 14px;
  flex: 1;

  white-space: nowrap;
  overflow: hidden;
  text-overflow: ellipsis;
}
.btn {
  width: 94px;
  height: 100%;
  line-height: 45px;
  text-align: center;
  font-size: 14px;
  color: #fff;
  background-color: #f63515;
}
topBar 高度原先为 45 变成 0 就可以隐藏,但是 DOM 还在,需要移除,移除的时间就是动画执行结束的时间,但这种写法过渡依赖上面的动画时间,上面动画时间一改,下面也得跟着改。
javascript
// 1.获取元素
var topBar = document.querySelector(".top-bar");
var deleteEl = topBar.querySelector(".delete");

// 2.监听delete的点击
deleteEl.onclick = function () {
  topBar.style.height = 0;
  setTimeout(function () {
    topBar.remove();
  }, 300);
};
有没有比较好的方法,可以监听动画结束
javascript
// 2.监听delete的点击
deleteEl.onclick = function () {
  topBar.style.height = 0;
};

// 3.监听过渡动画结束
topBar.ontransitionend = function () {
  topBar.remove();
};
案例实战三 – 侧边栏展示
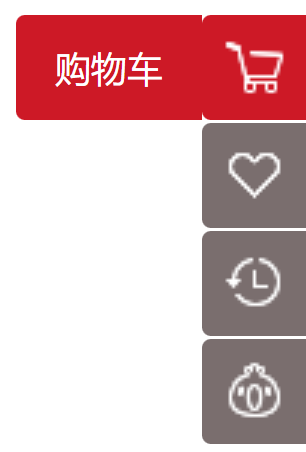
实现鼠标移入图标左侧侧边栏显示出来,并且移到购物车上购物车不会消失
html
<div class="tool-bar">
  <div class="item">
    <i class="icon icon01"></i>
    <div class="name">购物车</div>
  </div>
  <div class="item">
    <i class="icon icon02"></i>
    <div class="name">收藏</div>
  </div>
  <div class="item">
    <i class="icon icon03"></i>
    <div class="name">限时活动</div>
  </div>
  <div class="item">
    <i class="icon icon04"></i>
    <div class="name">大礼包</div>
  </div>
</div>
每个 icon 的 background-position 的 x 值都是一样,不同的是 y 值,分别是 0,-50px,-100px,-150px,这样便有规律可循。
一种做法是给每个 icon 加对应的 class,然后设置不同的 background-position,但是这样写起来有点麻烦
css
.tool-bar {
  position: fixed;
  top: 30%;
  right: 0;

  display: flex;
  flex-direction: column;
  align-items: center;

  width: 35px;
}

.item {
  position: relative;
  width: 35px;
  height: 35px;
  margin-bottom: 1px;

  background-color: #7a6e6e;
  border-radius: 3px 0 0 3px;
}

.icon {
  display: inline-block;
  width: 100%;
  height: 100%;
  cursor: pointer;
  background-image: url(./img/toolbars.png);
}

/* .icon01 {
background-position: -48px 0;
}
.icon02 {
background-position: -48px -50px;
}
.icon03 {
background-position: -48px -100px;
}
.icon04 {
background-position: -48px -150px;
} */

.name {
  position: absolute;
  z-index: -1;
  right: 35px;
  /* left: -62px; */
  top: 0;

  width: 0;
  height: 35px;
  line-height: 35px;

  color: #fff;
  text-align: center;
  font-size: 12px;
  background-color: #7a6e6e;
  cursor: pointer;

  border-radius: 3px 0 0 3px;
  transition: width 0.2s ease;
}

.item:hover,
.item:hover .name {
  background-color: #cd1926;
}
我们可以使用 for 循环对每个 icon 进行遍历,动态设置不同的 background-position,到这里图标就全都显示出来了。
javascript
// 1.动态给icon设置backgroundPosition
var iconEls = document.querySelectorAll(".icon");
for (var i = 0; i < iconEls.length; i++) {
  var iconEl = iconEls[i];
  iconEl.style.backgroundPosition = `-48px -${50 * i}px`;
}
然后对每个 item 进行遍历,鼠标移入的时候设置宽度为 62px,鼠标移出宽度设置为 0。
javascript
// 2.实现鼠标进入动画
// 方案一: mouseenter(不能使用事件委托)
var itemEls = document.querySelectorAll(".item");
for (var itemEl of itemEls) {
  itemEl.onmouseenter = function () {
    var nameEl = this.children[1];
    nameEl.style.width = "62px";
  };
  itemEl.onmouseleave = function () {
    var nameEl = this.children[1];
    nameEl.style.width = "0";
  };
}
但是,上面的写法有点消耗性能,执行了 8 次函数,我们可以使用事件委托。
最终为了拿到 name,首先判断不是 toolbarEl,并且判断 class 是否包含 item,有的话直接取当前的元素,否则去父元素找,不管是 icon 还是 name。
javascript
// 方案二: mouseover(使用事件委托)
var toolbarEl = document.querySelector(".tool-bar");
toolbarEl.onmouseover = function (event) {
  handleMouseEvent(event, 62);
};
toolbarEl.onmouseout = function (event) {
  handleMouseEvent(event, 0);
};

function handleMouseEvent(event, width) {
  if (event.target !== toolbarEl) {
    // var itemEl = event.target.classList.contains("item") ? event.target: event.target.parentElement
    // 1.获取唯一的item
    var itemEl = null;
    if (event.target.classList.contains("item")) {
      itemEl = event.target;
    } else {
      itemEl = event.target.parentElement;
    }

    // 2.根据item获取nameElement
    var nameEl = itemEl.children[1];

    // 3.设置宽度
    nameEl.style.width = `${width}px`;
  }
}
案例实战四 – 王者荣耀 tabControl

html
<div class="main main_wrapper">
  <div class="section-content">
    <div class="left-content">
      <div class="content-center">
        <div class="section_header">
          <div class="header_left">
            <h3 class="title">内容中心</h3>
          </div>
          <div class="header_right" href="#">
            <a class="more" href="#">更多</a>
          </div>
        </div>
        <div class="tab_control">
          <div class="item active">精品栏目</div>
          <div class="line"></div>
          <div class="item">赛事精品</div>
          <div class="line"></div>
          <div class="item">英雄攻略</div>
        </div>
      </div>
    </div>
  </div>
</div>
css
.main .section-content {
  display: flex;
  justify-content: space-between;
}

.main .section-content .left-content {
  width: 872px;
  height: 1000px;
}
.main .section-content .right-content {
  width: 295px;
  height: 500px;
}
javascript
// 1.获取元素
var tabControl = document.querySelector(".tab_control");

// 2.监听鼠标进入(事件委托)
var activeLiEl = tabControl.querySelector(".active");
tabControl.onmouseover = function (event) {
  // 1.拿到事件发生的对象
  var itemEl = event.target;
  if (itemEl.classList.contains("item")) {
    // 其他的取消active
    // 1.for循环所有的item
    // 2.querySelector(".active")
    // 3.记录当前的active对应的item
    activeLiEl.classList.remove("active");

    // 当前进入的item变成active
    itemEl.classList.add("active");

    // 将最新的itemEl变成activeLiEl
    activeLiEl = itemEl;
  }
};
案例实战五 – 王者轮播图
基本实现

html
<div class="main main_wrapper">
  <div class="news-section">
    <div class="banner">
      <ul class="image-list">
        <li class="item">
          <a href="">
            <img src="./img/banner_01.jpeg" alt="" />
          </a>
        </li>
        <li class="item">
          <a href="">
            <img src="./img/banner_02.jpeg" alt="" />
          </a>
        </li>
        <li class="item">
          <a href="">
            <img src="./img/banner_03.jpeg" alt="" />
          </a>
        </li>
        <li class="item">
          <a href="">
            <img src="./img/banner_04.jpeg" alt="" />
          </a>
        </li>
        <li class="item">
          <a href="">
            <img src="./img/banner_05.jpeg" alt="" />
          </a>
        </li>
      </ul>
      <ul class="title-list">
        <li class="item active">
          <a href="#">桑启的旅途故事</a>
        </li>
        <li class="item">
          <a href="#">启示之音抢先听</a>
        </li>
        <li class="item">
          <a href="#">谁成为版本之子</a>
        </li>
        <li class="item">
          <a href="#">观赛体验升级</a>
        </li>
        <li class="item">
          <a href="#">季后赛开战</a>
        </li>
      </ul>
    </div>
    <div class="news"></div>
    <div class="download">
      <a class="download-btn" href="#"></a>
      <a class="guard-btn" href="#"></a>
      <a class="experience-btn" href="#"></a>
    </div>
  </div>
</div>
css
.main {
  height: 100px;
}

.news-section {
  display: flex;
  height: 342px;
}

.news-section .banner {
  width: 605px;
  background-color: #000;
  overflow: hidden;
}

.news-section .banner .image-list {
  display: flex;
  width: 604px;
  /* overflow: hidden; */
}

.news-section .banner .image-list .item {
  flex-shrink: 0;
  width: 100%;
}

.news-section .banner .image-list .item a {
  display: block;
}

.news-section .banner .image-list .item a img {
  width: 100%;
}

.news-section .banner .title-list {
  display: flex;
  height: 44px;
  line-height: 44px;
}

.news-section .banner .title-list .item {
  flex: 1;
  text-align: center;
}

.news-section .banner .title-list .item a {
  display: block;
  font-size: 14px;
  color: #b1b2be;
}
.news-section .banner .title-list .item.active a,
.news-section .banner .title-list .item a:hover {
  color: #f3c258;
  background-color: rgba(255, 255, 255, 0.15);
}

.news-section .news {
  flex: 1;
  background-color: purple;
}

.news-section .download {
  width: 236px;
  background-color: skyblue;
}

.news-section .download a {
  display: block;
  background: url(./img/main_sprite.png) no-repeat;
}

.news-section .download a.download-btn {
  height: 128px;
  background-position: 0 -219px;
}

.news-section .download a.guard-btn {
  height: 106px;
  background-position: 0 -350px;
}

.news-section .download a.experience-btn {
  height: 108px;
  background-position: 0 -461px;
}
javascript
// 1.获取元素
var titleListEl = document.querySelector(".title-list");
var activeItemEl = document.querySelector(".active");

var imageListEl = document.querySelector(".image-list");

// 2.底部titles的切换, 同时进行轮播
titleListEl.onmouseover = function (event) {
  // 1.1.确定发生鼠标进入的元素
  var itemEl = event.target.parentElement;
  if (!itemEl.classList.contains("item")) return;

  // 1.2.移除之前的active
  activeItemEl.classList.remove("active");

  // 1.3.将active添加到鼠标进入的元素
  itemEl.classList.add("active");

  // 1.4.让activeItemEl指向最新的元素
  activeItemEl = itemEl;

  // 1.5.移动对应的imageListEl
  // 1.5.1. 获取itemEl所在的索引
  // for (var i = 0; i < titleListEl.children.length; i++) {
  //   if (titleListEl.children[i] === itemEl) break
  // }
  var index = Array.from(titleListEl.children).findIndex(function (item) {
    return item === itemEl;
  });

  // 第1张向左移动0,第2张向左移动-604 * 1px,第3张向左移动-604 * 2px,以此类推
  imageListEl.style.transform = `translateX(${-604 * index}px)`;
  imageListEl.style.transition = `all 300ms ease`;
};
添加定时器
javascript
// 1.获取元素
var titleListEl = document.querySelector(".title-list");
var imageListEl = document.querySelector(".image-list");

// 定义变量保存一些的状态
var activeItemEl = document.querySelector(".active");

var currentIndex = 0; // 用一个变量记录当前的索引

// 2.底部titles的切换, 同时进行轮播
titleListEl.onmouseover = function (event) {
  // 1.1.确定发生鼠标进入的元素
  var itemEl = event.target.parentElement;
  if (!itemEl.classList.contains("item")) return;

  // 1.2.移除之前的active
  activeItemEl.classList.remove("active");

  // 1.3.将active添加到鼠标进入的元素
  itemEl.classList.add("active");

  // 1.4.让activeItemEl指向最新的元素
  activeItemEl = itemEl;

  // 1.5.移动对应的imageListEl
  var index = Array.from(titleListEl.children).findIndex(function (item) {
    return item === itemEl;
  });

  imageListEl.style.transform = `translateX(${-604 * index}px)`;
  imageListEl.style.transition = `all 300ms ease`;

  currentIndex = index;
};

// 3.定时器: 定时轮播
setInterval(function () {
  currentIndex++;
  // 轮播到最后一个变成0
  if (currentIndex === titleListEl.children.length) {
    currentIndex = 0;
  }

  imageListEl.style.transform = `translateX(${-604 * currentIndex}px)`;
  imageListEl.style.transition = `all 300ms ease`;

  // 处理titles中的li的active
  // 1> 移除之前的active
  activeItemEl.classList.remove("active");

  // 2> 添加新的active
  var currentItemEl = titleListEl.children[currentIndex];
  currentItemEl.classList.add("active");

  // 3> 记录新的activeLi
  activeItemEl = currentItemEl;
}, 3000);
代码重构
上面的 onmouseover 和 setInterval 中存在大量相同的代码,可以进行重构,将相同的代码抽取到 switchBanner 函数中。
javascript
// 1.获取元素
var titleListEl = document.querySelector(".title-list");
var imageListEl = document.querySelector(".image-list");

// 定义变量保存一些的状态
var activeItemEl = document.querySelector(".active");
var currentIndex = 0;

// 2.底部titles的切换, 同时进行轮播
titleListEl.onmouseover = function (event) {
  // 1.1.确定发生鼠标进入的元素
  var itemEl = event.target.parentElement;
  if (!itemEl.classList.contains("item")) return;

  // 1.2.获取对应的索引index
  var index = Array.from(titleListEl.children).findIndex(function (item) {
    return item === itemEl;
  });
  currentIndex = index;

  // 1.3.调用切换的函数
  switchBanner();
};

// 3.定时器: 定时轮播
setInterval(function () {
  currentIndex++;
  if (currentIndex === titleListEl.children.length) {
    currentIndex = 0;
  }

  // 调用切换的函数
  switchBanner();
}, 3000);

// 封装一个切换轮播的函数
function switchBanner() {
  // 第一件事情: 让imageListEl滚动
  // 1.1.让imageListEl修改transform
  imageListEl.style.transform = `translateX(${-604 * currentIndex}px)`;
  imageListEl.style.transition = `all 300ms ease`;

  // 第二件事情: 改变title选中
  // 1.2.移除之前的active
  activeItemEl.classList.remove("active");

  // 1.3.将active添加到鼠标进入的元素
  var currentItemEl = titleListEl.children[currentIndex];
  currentItemEl.classList.add("active");

  // 1.4.让activeItemEl指向最新的元素
  activeItemEl = currentItemEl;
}
移除定时器
javascript
// 1.获取元素
var titleListEl = document.querySelector(".title-list");
var imageListEl = document.querySelector(".image-list");
var bannerEl = document.querySelector(".banner");
// 定义变量保存一些的状态
var activeItemEl = document.querySelector(".active");
var currentIndex = 0;
var timerID = null; // 记录定时器
// 2.底部titles的切换, 同时进行轮播
titleListEl.onmouseover = function (event) {
// 1.1.确定发生鼠标进入的元素
var itemEl = event.target.parentElement;
if (!itemEl.classList.contains("item")) return;
// 1.2.获取对应的索引index
var index = Array.from(titleListEl.children).findIndex(function (item) {
return item === itemEl;
});
currentIndex = index;
// 1.3.调用切换的函数
switchBanner();
};
// 3.定时器: 定时轮播
startTimer();
// 监听banner的事件
bannerEl.onmouseenter = function () {
clearInterval(timerID); // 鼠标进入清除定时器
};
bannerEl.onmouseleave = function () {
startTimer(); // 鼠标离开再次添加到定时器,由于是重复代码,可以抽取到一个函数中
};
// 封装一个切换轮播的函数
function switchBanner() {
// 第一件事情: 让imageListEl滚动
// 1.1.让imageListEl修改transform
imageListEl.style.transform = `translateX(${-604 * currentIndex}px)`;
imageListEl.style.transition = `all 300ms ease`;
// 第二件事情: 改变title选中
// 1.2.移除之前的active
activeItemEl.classList.remove("active");
// 1.3.将active添加到鼠标进入的元素
var currentItemEl = titleListEl.children[currentIndex];
currentItemEl.classList.add("active");
// 1.4.让activeItemEl指向最新的元素
activeItemEl = currentItemEl;
}
// 封装一个添加定时器的函数
function startTimer() {
timerID = setInterval(function () {
currentIndex++;
if (currentIndex === titleListEl.children.length) {
currentIndex = 0;
}
// 调用切换的函数
switchBanner();
}, 3000);
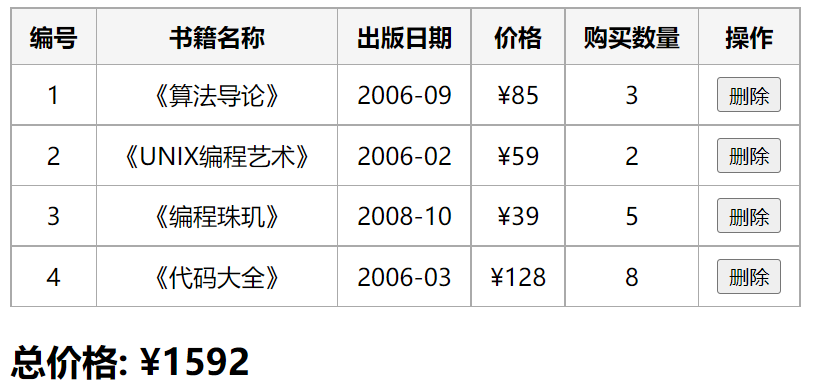
}案例实战六 – 书籍购物车
基本搭建
html
<table>
  <thead>
    <tr>
      <th>编号</th>
      <th>书籍名称</th>
      <th>出版日期</th>
      <th>价格</th>
      <th>购买数量</th>
      <th>操作</th>
    </tr>
  </thead>
  <tbody></tbody>
</table>
css
table {
  border-collapse: collapse;
}

thead {
  background-color: #f5f5f5;
}

th,
td {
  border: 1px solid #aaa;
  padding: 8px 12px;
  text-align: center;
}
javascript
// 1.从服务器获取数据 ajax/fetch
var books = [
  {
    id: 1,
    name: "《算法导论》",
    date: "2006-09",
    price: 85.0,
    count: 3,
  },
  {
    id: 2,
    name: "《UNIX编程艺术》",
    date: "2006-02",
    price: 59.0,
    count: 2,
  },
  {
    id: 3,
    name: "《编程珠玑》",
    date: "2008-10",
    price: 39.0,
    count: 5,
  },
  {
    id: 4,
    name: "《代码大全》",
    date: "2006-03",
    price: 128.0,
    count: 8,
  },
];

// 2.对数据展示
// 到底通过html直接编写, 还是通过JavaScriptDOM操作创建元素
// 1> 对于固定的, 直接通过html编写(能通过html编写, 尽量通过html直接编写)
// 2> 对于哪些大量的数据, 有规律的数据, 可以通过JavaScript编写
var tbodyEl = document.querySelector("tbody");

// 2.2. 动态添加tr以及内部数据
for (var i = 0; i < books.length; i++) {
  var trowEl = document.createElement("tr");

  // 2.3. 放具体数据
  var book = books[i];
  var bookKeys = Object.keys(book);
  for (var m = 0; m < bookKeys.length; m++) {
    var key = bookKeys[m];
    var value = book[key];
    var tdEl = document.createElement("td");
    if (key === "price") {
      value = "¥" + value;
    }
    tdEl.textContent = value;
    trowEl.append(tdEl);
  }

  // 2.4. 添加删除按钮
  var deleteTdEl = document.createElement("td");
  var deleteBtnEl = document.createElement("button");
  deleteBtnEl.textContent = "删除";
  deleteTdEl.append(deleteBtnEl);
  trowEl.append(deleteTdEl);

  tbodyEl.append(trowEl);
}
删除操作
javascript
// 2.2. 动态添加tr以及内部数据
for (var i = 0; i < books.length; i++) {
  var trowEl = document.createElement("tr");

  // 2.3. 放具体数据
  var book = books[i];
  var bookKeys = Object.keys(book);
  for (var m = 0; m < bookKeys.length; m++) {
    var key = bookKeys[m];
    var value = book[key];
    var tdEl = document.createElement("td");
    if (key === "price") {
      value = "¥" + value;
    }
    tdEl.textContent = value;
    trowEl.append(tdEl);
  }

  // 2.4. 添加删除按钮
  var deleteTdEl = document.createElement("td");
  var deleteBtnEl = document.createElement("button");
  deleteBtnEl.textContent = "删除";
  deleteTdEl.append(deleteBtnEl);
  trowEl.append(deleteTdEl);

  // 2.5.监听删除按钮的点击
  deleteBtnEl.onclick = function () {
    // 1.删除对应的trow
    var deleteTRowEl = this.parentElement.parentElement;
    var deleteTrIndex = deleteTRowEl.sectionRowIndex;
    deleteTRowEl.remove();

    // 2.删除对应books中的数据
    books.splice(deleteTrIndex, 1);

    // 3.重新计算一次价格
    calcTotalPrice();
  };

  tbodyEl.append(trowEl);
}

// 3.计算总价格
var priceCountEl = document.querySelector(".price-count");
calcTotalPrice();

// 封装计算价格的函数
function calcTotalPrice() {
  var totalPrice = books.reduce(function (preValue, item) {
    return preValue + item.count * item.price;
  }, 0);
  priceCountEl.textContent = totalPrice;
}