Appearance
认识 Plugin
Webpack 的另一个核心是 Plugin,官方有这样一段对 Plugin 的描述:
While loaders are used to transform certain types of modules, plugins can be leveraged to perform a wider range
of tasks like bundle optimization, asset management and injection of environment variables.
上面表达的含义翻译过来就是:
Loader 是用于特定的模块类型进行转换;
Plugin 可以用于执行更加广泛的任务,比如打包优化、资源管理、环境变量注入等;
CleanWebpackPlugin
前面我们演示的过程中,每次修改了一些配置,重新打包时,都需要手动删除 dist 文件夹:
我们可以借助于一个插件来帮助我们完成,这个插件就是 CleanWebpackPlugin;
首先,我们先安装这个插件:
npm install clean-webpack-plugin -D
之后在插件中配置:
javascript
const { CleanWebpackPlugin } = require("clean-webpack-plugin");

module.exports = {
  plugins: [new CleanWebpackPlugin()],
};
除了使用 CleanWebpackPlugin 插件,也可以直接在 output 中配置 clean,效果一样
javascript
module.exports = {
  mode: "production",
  entry: "./src/main.js",
  output: {
    filename: "bundle.js",
    path: path.resolve(__dirname, "./build"),
    clean: true, // 同CleanWebpackPlugin插件
  },
};
HtmlWebpackPlugin
另外还有一个不太规范的地方:
我们的 HTML 文件是编写在根目录下的,而最终打包的 dist 文件夹中是没有 index.html 文件的。
在进行项目部署的时,必然也是需要有对应的入口文件 index.html;
所以我们也需要对 index.html 进行打包处理;
对 HTML 进行打包处理我们可以使用另外一个插件:HtmlWebpackPlugin;
npm install html-webpack-plugin -D
javascript
const HtmlWebpackPlugin = require("html-webpack-plugin");
module.exports = {
plugins: [new HtmlWebpackPlugin()],
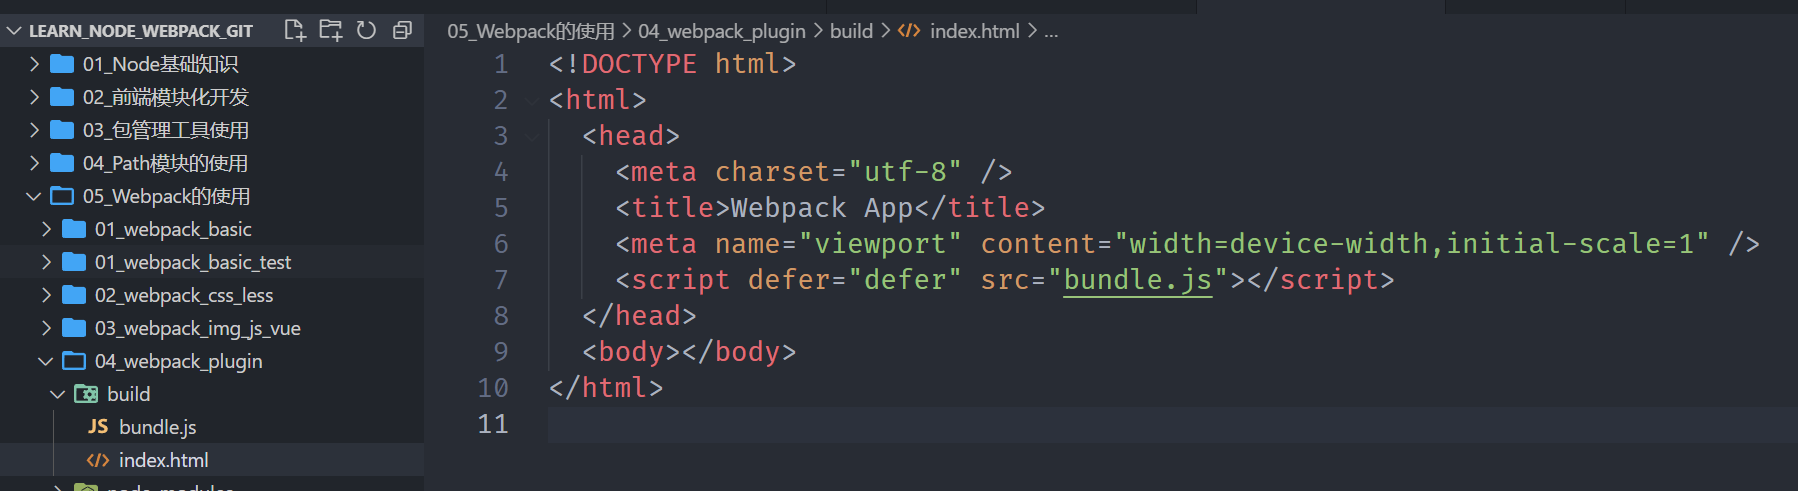
};重新打包之后,就会在打包的文件夹下面生成一个 index.html
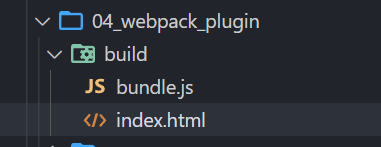
生成 index.html 分析
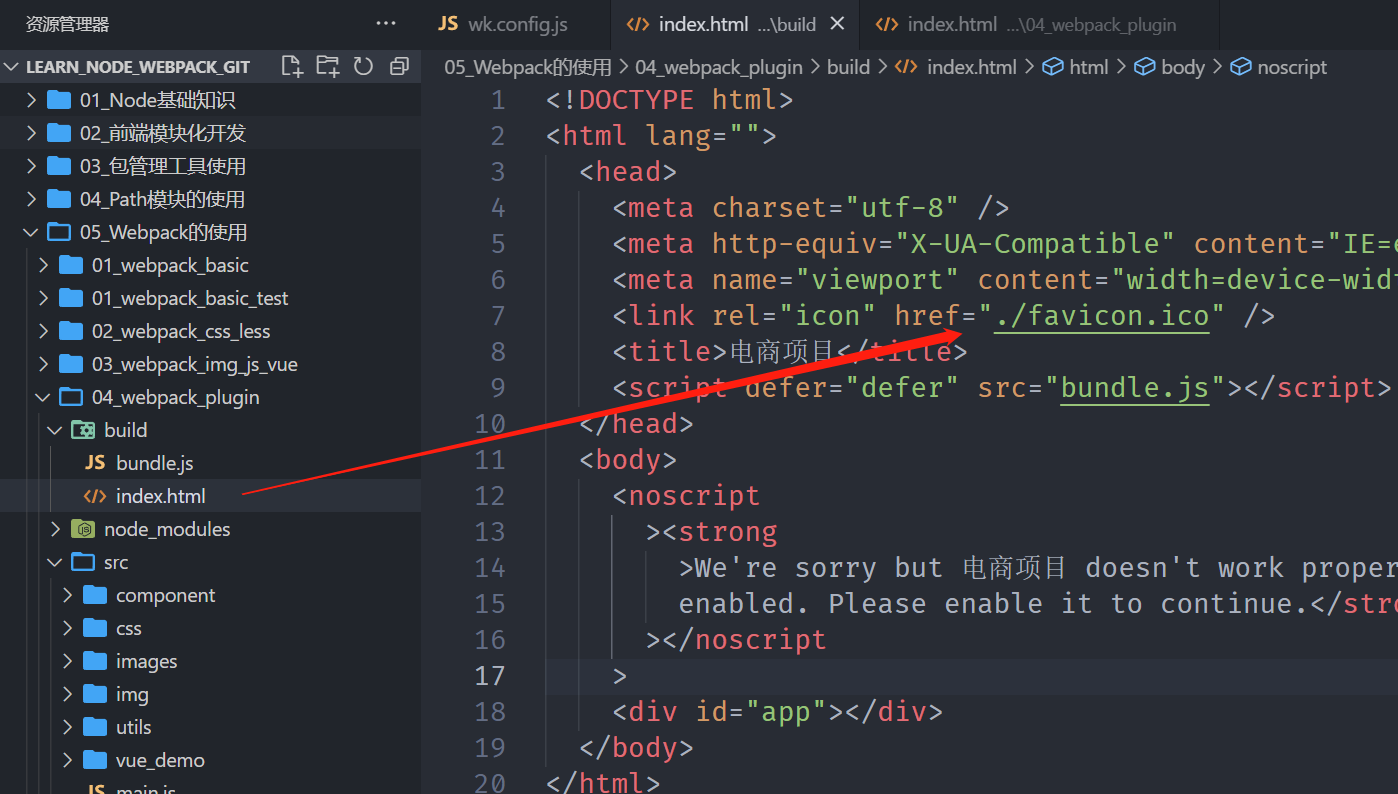
我们会发现,现在自动在 dist 文件夹中,生成了一个 index.html 的文件:
该文件中也自动添加了我们打包的 bundle.js 文件;
如果我们想改 index.html 文件中的 title,可以在 HtmlWebpackPlugin 中传参
javascript
new HtmlWebpackPlugin({
title: "电商项目",
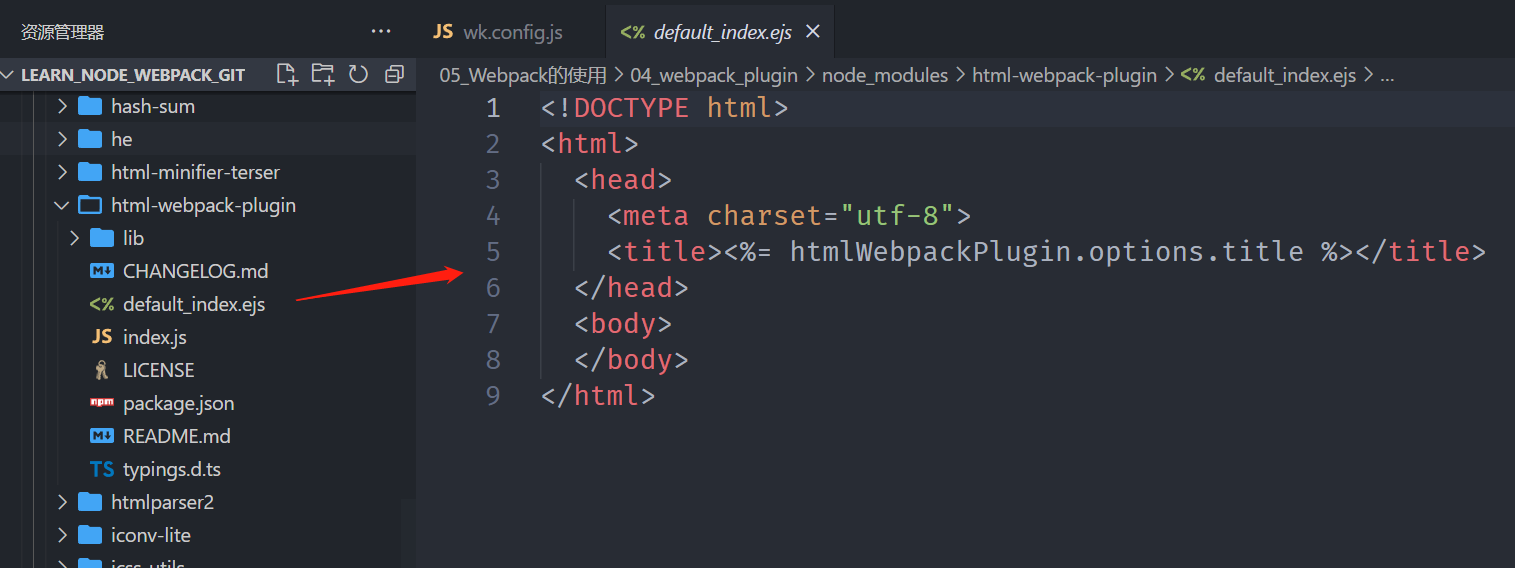
});这个文件是如何生成的呢?
默认情况下是根据 ejs 的一个模板来生成的;
在 html-webpack-plugin 的源码中,有一个 default_index.ejs 模块;
自定义 HTML 模板
如果我们想在自己的模块中加入一些比较特别的内容:
比如添加一个 noscript 标签,在用户的 JavaScript 被关闭时,给予响应的提示;
比如在开发 vue 或者 react 项目时,我们需要一个可以挂载后续组件的根标签
;这个我们需要一个属于自己的 index.html 模块:
这里将 index.html 事先准备好
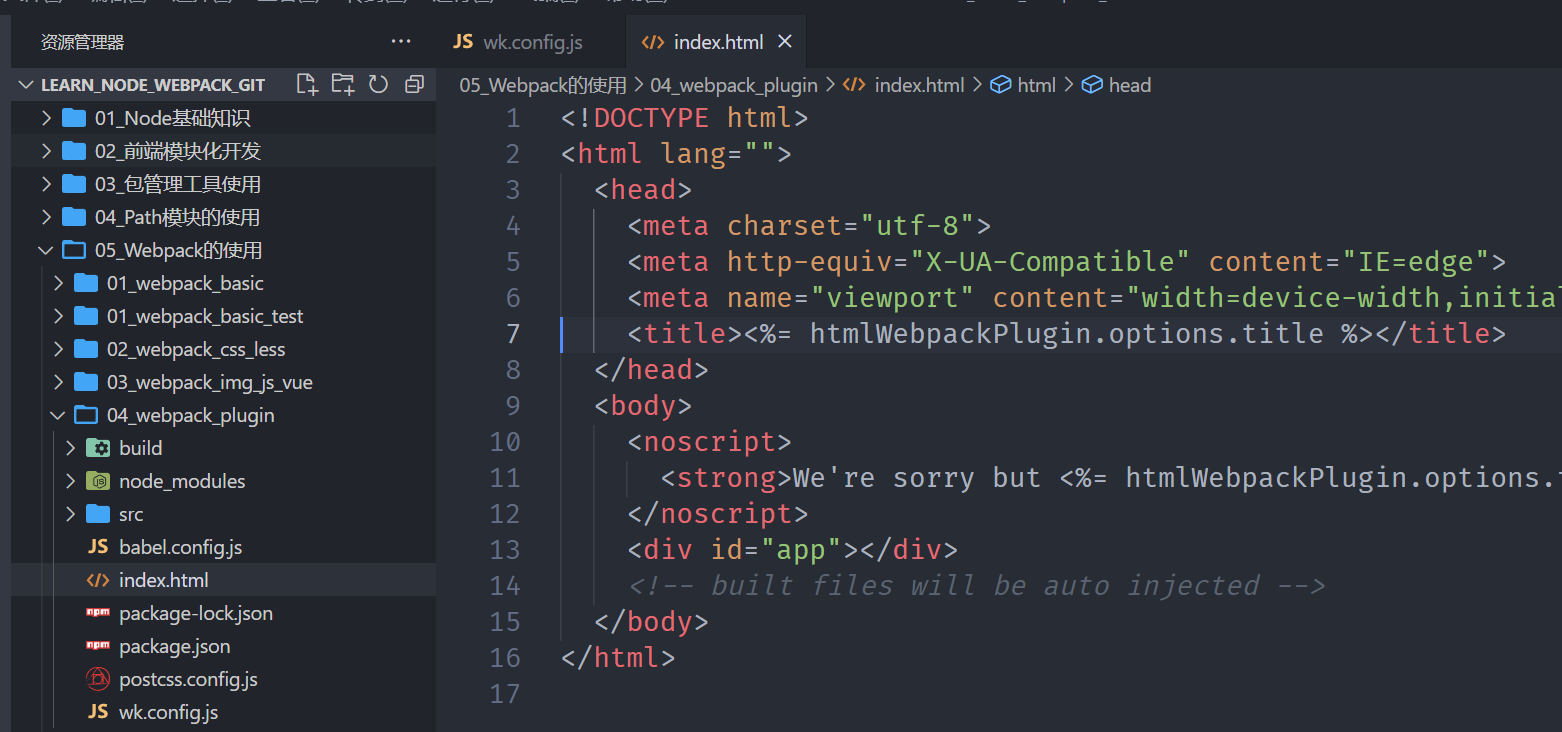
index.html
html
<!DOCTYPE html>
<html lang="">
  <head>
    <meta charset="utf-8" />
    <meta http-equiv="X-UA-Compatible" content="IE=edge" />
    <meta name="viewport" content="width=device-width,initial-scale=1.0" />
    <title><%= htmlWebpackPlugin.options.title %></title>
  </head>
  <body>
    <noscript>
      <strong
        >We're sorry but <%= htmlWebpackPlugin.options.title %> doesn't work
        properly without JavaScript enabled. Please enable it to
        continue.</strong
      >
    </noscript>
    <div id="app"></div>
    <!-- built files will be auto injected -->
  </body>
</html>
然后,在插件中使用自定义的模板,打包后的 index.html 就会使用这个模板
javascript
new HtmlWebpackPlugin({
  title: "电商项目",
  template: "./index.html",
});
自定义模板数据填充
上面的代码中,会有一些类似这样的语法<% 变量 %>,这个是 EJS 模块填充数据的方式。
在配置 HtmlWebpackPlugin 时,我们可以添加如下配置:
**template:**指定我们要使用的模块所在的路径;
**title:**在进行 htmlWebpackPlugin.options.title 读取时,就会读到该信息;
DefinePlugin 的介绍
但是,这个时候编译还是会报错,因为在我们的模块中还使用到一个 BASE_URL 的常量:
这是因为在编译 template 模块时,有一个 BASE_URL:
html
<!DOCTYPE html>
<html lang="">
  <head>
    <meta charset="utf-8" />
    <meta http-equiv="X-UA-Compatible" content="IE=edge" />
    <meta name="viewport" content="width=device-width,initial-scale=1.0" />
    <link rel="icon" href="<%= BASE_URL %>favicon.ico" />
    //
    这里有BASE_URL,刚才演示HtmlWebpackPlugin时候先将这里删除,因为BASE_URL必须使用DefinePlugin插件
    <title><%= htmlWebpackPlugin.options.title %></title>
  </head>
  <body>
    <noscript>
      <strong
        >We're sorry but <%= htmlWebpackPlugin.options.title %> doesn't work
        properly without JavaScript enabled. Please enable it to
        continue.</strong
      >
    </noscript>
    <div id="app"></div>
    <!-- built files will be auto injected -->
  </body>
</html>
html
<link rel="icon" href="<%= BASE_URL %>favicon.ico" />但是我们并没有设置过这个常量值,所以会出现没有定义的错误;
这个时候我们可以使用 DefinePlugin 插件;
DefinePlugin 的使用
DefinePlugin 允许在编译时创建配置的全局常量,是一个 webpack 内置的插件(不需要单独安装):
这个时候,编译 template 就可以正确的编译了,会读取到 BASE_URL 的值;
javascript
const { DefinePlugin } = require("webpack");

plugins: [
  new DefinePlugin({
    BASE_URL: "'./'",
  }),
];
打包后的 index.html 中的 BASE_URL 也被解析成./
当然,我们也可以定义一些全局变量,在项目任何地方都能使用
javascript
plugins: [
  new DefinePlugin({
    BASE_URL: "'./'",
    coderwhy: "'why'",
    counter: "123",
  }),
];
在 main.js 中使用
javascript
// 使用通过DefinePlugin注入的变量
console.log(coderwhy); // why
console.log(counter); // 123
Mode 配置
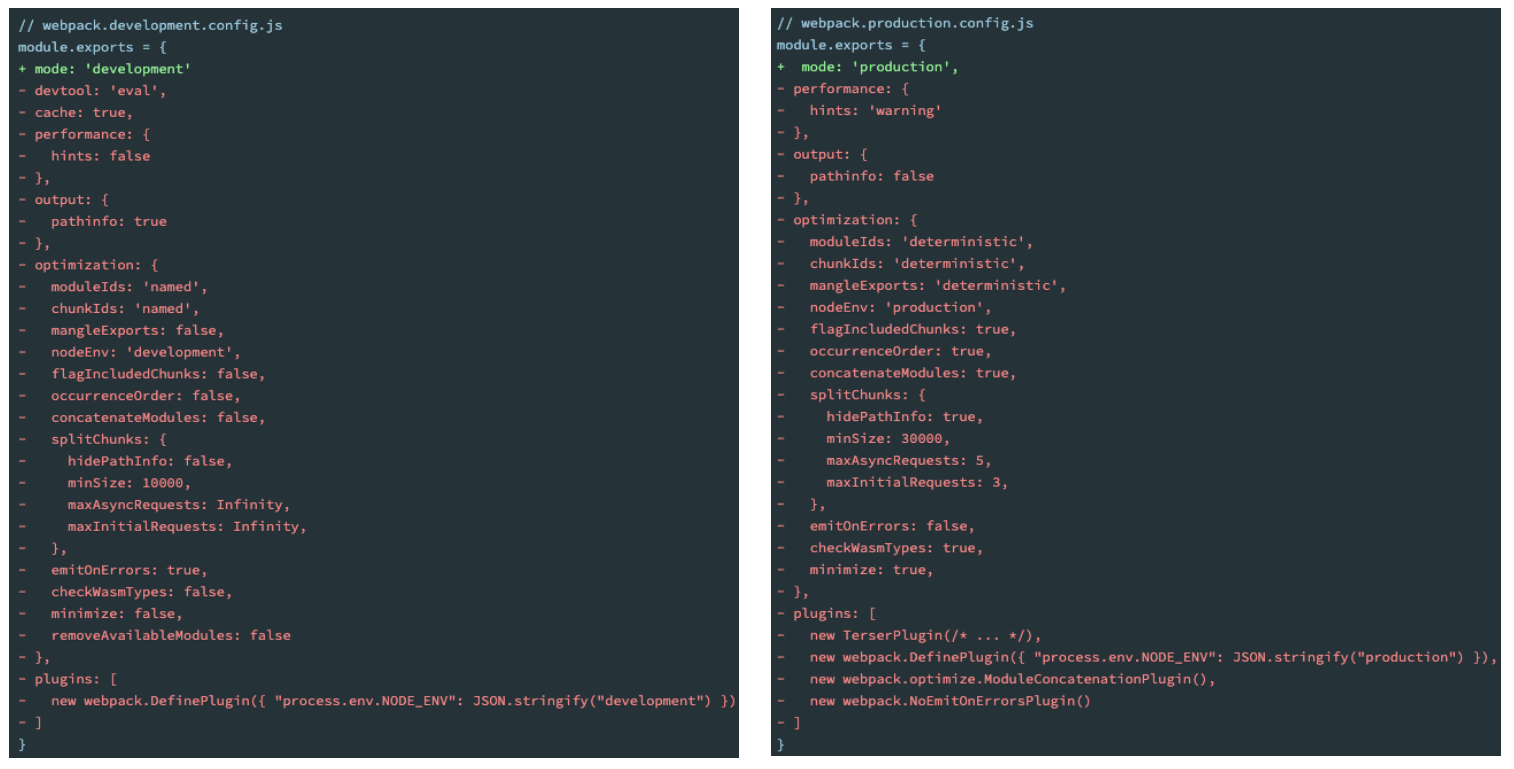
前面我们一直没有讲 mode。
Mode 配置选项,可以告知 webpack 使用相应模式的内置优化:
默认值是 production(什么都不设置的情况下);
可选值有:'none' | 'development' | 'production';
这几个选项有什么样的区别呢?

Mode 配置代表更多
配置了 mode 为 development 或 production,相当于分别配置了对应底下的红色部门。