Appearance
认识组件的嵌套
前面我们是将所有的逻辑放到一个 App.vue 中:
在之前的案例中,我们只是创建了一个组件 App;
如果我们一个应用程序将所有的逻辑都放在一个组件中,那么这个组件就会变成非常的臃肿和难以维护;
所以组件化的核心思想应该是对组件进行拆分,拆分成一个个小的组件;
再将这些组件组合嵌套在一起,最终形成我们的应用程序;
我们来分析一下下面代码的嵌套逻辑,假如我们将所有的代码逻辑都放到一个 App.vue 组件中:
我们会发现,将所有的代码逻辑全部放到一个组件中,代码是非常的臃肿和难以维护的。
并且在真实开发中,我们会有更多的内容和代码逻辑,对于扩展性和可维护性来说都是非常差的。
所以,在真实的开发中,我们会对组件进行拆分,拆分成一个个功能的小组件。
组件的拆分
我们可以按照如下的方式进行拆分:
按照如上的拆分方式后,我们开发对应的逻辑只需要去对应的组件编写就可。
App.vue
javascript
<template>
  <div class="app">
    <app-header></app-header>
    <app-content></app-content>
    <app-footer></app-footer>
  </div>
</template>

<script>
  import AppHeader from './components/AppHeader.vue'
  import AppContent from './components/AppContent.vue'
  import AppFooter from './components/AppFooter.vue'

  export default {
    components: {
      AppHeader,
      AppContent,
      AppFooter
    }
  }
</script>

<style scoped>
</style>
components/AppHeader.vue
javascript
<template>
  <div class="header">
    <div class="top">top banner</div>
    <input type="text">
    <div class="nav">nav</div>
  </div>
</template>

<script>
  export default {

  }
</script>

<style scoped>
  .header {
    background-color: orange;
  }
</style>
components/AppContent.vue
javascript
<template>
  <div class="content">
    <div class="banner">banner</div>
    <app-content-list></app-content-list>
  </div>
</template>

<script>
  import AppContentList from './AppContentList'

  export default {
    components: {
      AppContentList
    }
  }
</script>

<style scoped>
  .content {
    background-color: blue;
    color: white;
  }
</style>
components/AppContentList.vue
javascript
<template>
  <ul>
    <li>商品列表1</li>
    <li>商品列表2</li>
    <li>商品列表3</li>
    <li>商品列表4</li>
  </ul>
</template>

<script>
  export default {

  }
</script>

<style scoped>
</style>
components/AppFooter.vue
javascript
<template>
  <div class="footer">
    <div>物流配送</div>
    <div>版权声明</div>
    <div>免责声明</div>
    <div>注册地址: 广州市天河区</div>
  </div>
</template>

<script>
  export default {

  }
</script>

<style scoped>
  .footer {
    background-color: green;
  }
</style>
组件的通信
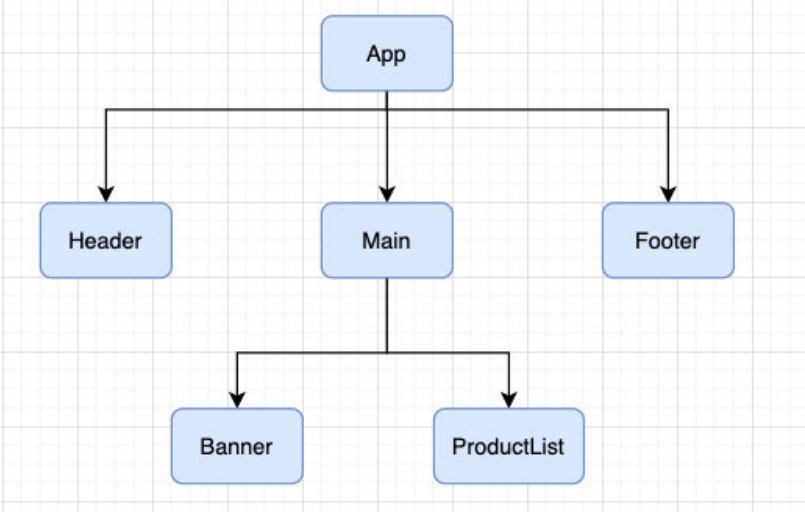
上面的嵌套逻辑如下,它们存在如下关系:
App 组件是 Header、Main、Footer 组件的父组件;
Main 组件是 Banner、ProductList 组件的父组件;
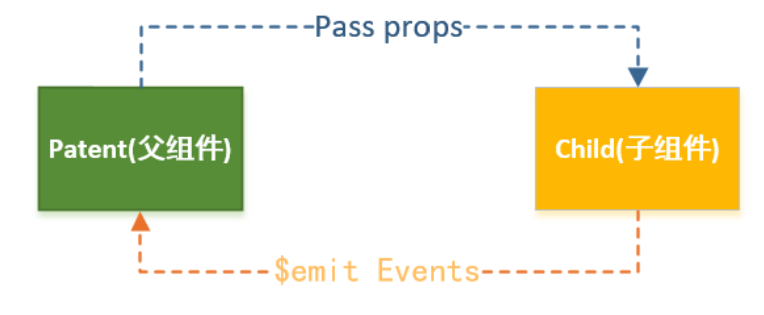
在开发过程中,我们会经常遇到需要组件之间相互进行通信:
比如 App 可能使用了多个 Header,每个地方的 Header 展示的内容不同,那么我们就需要使用者传递给 Header 一些数据,让
其进行展示;
又比如我们在 Main 中一次性请求了 Banner 数据和 ProductList 数据,那么就需要传递给它们来进行展示;
也可能是子组件中发生了事件,需要由父组件来完成某些操作,那就需要子组件向父组件传递事件;
总之,在一个 Vue 项目中,组件之间的通信是非常重要的环节,所以接下来我们就具体学习一下组件之间是如何相互之间传递数
据的;
父子组件之间通信的方式
父子组件之间如何进行通信呢?
父组件传递给子组件:通过 props 属性;
子组件传递给父组件:通过$emit 触发事件;
父组件传递给子组件
在开发中很常见的就是父子组件之间通信,比如父组件有一些数据,需要子组件来进行展示:
这个时候我们可以通过 props 来完成组件之间的通信;
什么是 Props 呢?
Props 是你可以在组件上注册一些自定义的 attribute;
父组件给这些 attribute 赋值,子组件通过 attribute 的名称获取到对应的值;
Props 有两种常见的用法:
方式一:字符串数组,数组中的字符串就是 attribute 的名称;
App.vue
javascript
<template>
  <!-- 1.展示why的个人信息 -->
  <!-- 如果当前的属性是一个非prop的attribute, 那么该属性会默认添加到子组件的根元素上 -->
  <show-info name="why" :age="18" :height="1.88"
             address="广州市" abc="cba" class="active" />

  <!-- 2.展示kobe的个人信息 -->
  <show-info name="kobe" :age="30" :height="1.87" />

</template>

<script>
  import ShowInfo from './ShowInfo.vue'

  export default {
    components: {
      ShowInfo
    }
  }
</script>

<style scoped>
</style>
ShowInfo.vue
javascript
<template>
  <div class="infos">
    <h2 :class="$attrs.class">姓名: {{ name }}</h2>
    <h2>年龄: {{ age }}</h2>
    <h2>身高: {{ height }}</h2>
  </div>

</template>

<script>
  export default {
    // 作用: 接收父组件传递过来的属性
    // 1.props数组语法
    // 弊端: 1> 不能对类型进行验证 2.没有默认值
    props: ["name", "age", "height"]
  }
</script>

<style scoped>
</style>
方式二:对象类型,对象类型我们可以在指定 attribute 名称的同时,指定它需要传递的类型、是否是必须的、默认值等等;
Props 的对象用法
数组用法中我们只能说明传入的 attribute 的名称,并不能对其进行任何形式的限制,接下来我们来看一下对象的写法是如何让
我们的 props 变得更加完善的。
当使用对象语法的时候,我们可以对传入的内容限制更多:
比如指定传入的 attribute 的类型;
比如指定传入的 attribute 是否是必传的;
比如指定没有传入时,attribute 的默认值;
细节一:那么 type 的类型都可以是哪些呢?
那么 type 的类型都可以是哪些呢?
String
Number
Boolean
Array
Object
Date
Function
Symbol
细节二:对象类型的其他写法
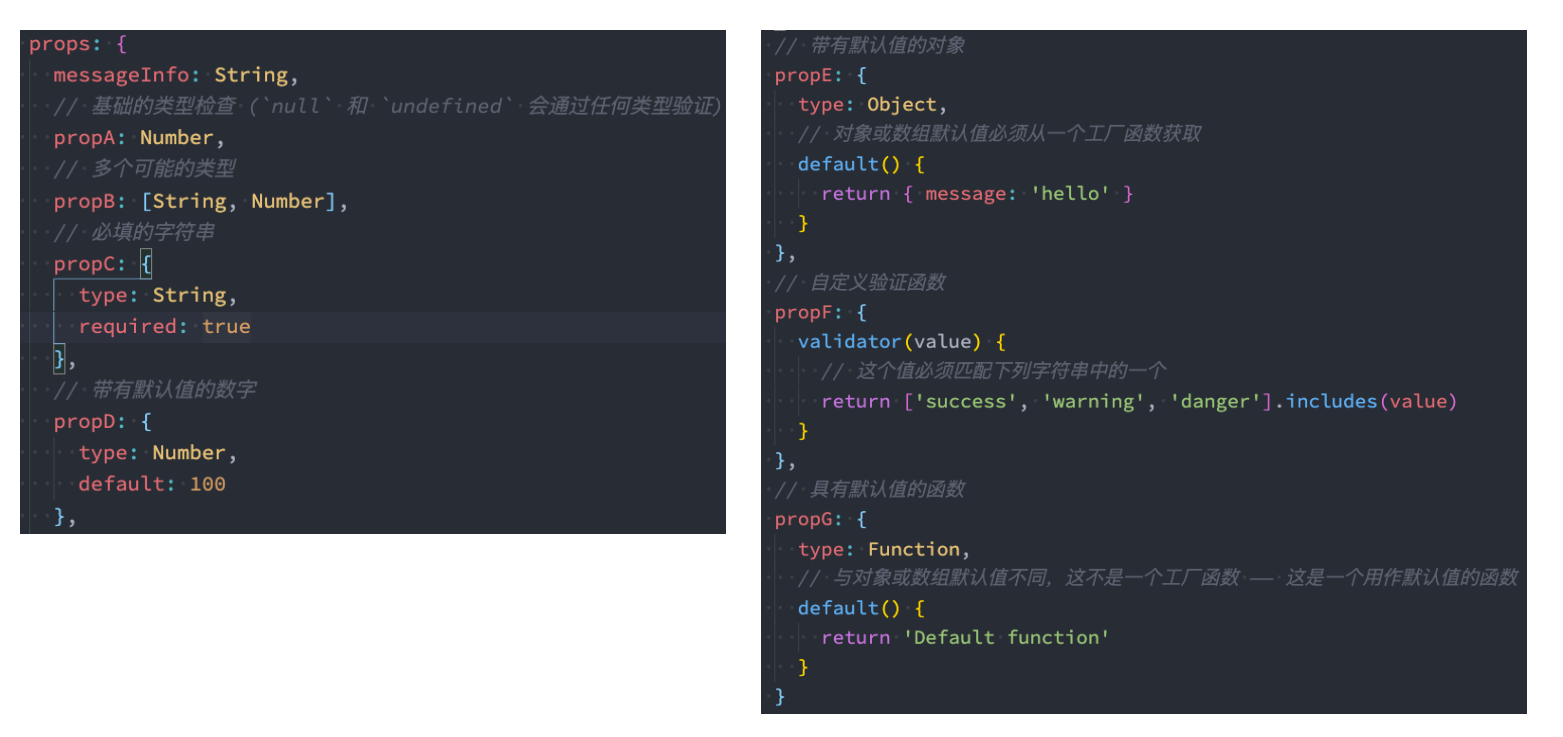
细节三:Prop 的大小写命名
Prop 的大小写命名(camelCase vs kebab-case)
HTML 中的 attribute 名是大小写不敏感的,所以浏览器会把所有大写字符解释为小写字符;
这意味着当你使用 DOM 中的模板时,camelCase (驼峰命名法) 的 prop 名需要使用其等价的 kebab-case (短横线分隔命名)
命名;
javascript
<template>
  <!-- 1.展示why的个人信息 -->
  <!-- 如果当前的属性是一个非prop的attribute, 那么该属性会默认添加到子组件的根元素上 -->
  <show-info name="why" :age="18" :height="1.88" />

  <!-- 2.展示kobe的个人信息 -->
  <show-info name="kobe" :age="30" :height="1.87" />

  <!-- 3.展示默认的个人信息,show-message使用短横线或showMessage都行 -->
  <show-info :age="100" show-message="哈哈哈哈"/>

</template>

<script>
  import ShowInfo from './ShowInfo.vue'

  export default {
    components: {
      ShowInfo
    }
  }
</script>

<style scoped>
</style>
javascript
<template>
  <div class="infos">
    <h2>姓名: {{ name }}</h2>
    <h2>年龄: {{ age }}</h2>
    <h2>身高: {{ height }}</h2>

    <h2>Message: {{ showMessage }}</h2>
  </div>

  <div class="others" v-bind="$attrs"></div>
</template>

<script>
  export default {
    // 作用: 接收父组件传递过来的属性
    // 1.props数组语法
    // 弊端: 1> 不能对类型进行验证 2.没有默认值的
    // props: ["name", "age", "height"]

    // 2.props对象语法(必须掌握)
    props: {
      name: {
        type: String,
        default: "我是默认name"
      },
      age: {
        type: Number,
        required: true,
        default: 0
      },
      height: {
        type: Number,
        default: 2
      },
      // 重要的原则: 对象类型写默认值时, 需要编写default的函数, 函数返回默认值
      friend: {
        type: Object,
        default() {
          return { name: "james" }
        }
      },
      hobbies: {
        type: Array,
        default: () => ["篮球", "rap", "唱跳"]
      },
      showMessage: {
        type: String,
        default: "我是showMessage"
      }
    }
  }
</script>

<style scoped>
</style>
非 Prop 的 Attribute
什么是非 Prop 的 Attribute 呢?
当我们传递给一个组件某个属性,但是该属性并没有定义对应的 props 或者 emits 时,就称之为 非 Prop 的 Attribute;
常见的包括 class、style、id 属性等;
Attribute 继承
当组件有单个根节点时,非 Prop 的 Attribute 将自动添加到根节点的 Attribute 中:
javascript
<show-info name="why" :age="18" :height="1.88"
             address="广州市" abc="cba" class="active" />
上面 address、abc、class 这些属性是非 prop 的 Attribute,那么这些属性默认会添加到子组件 ShowInfo.vue 的根节点中,比如下面的
ShowInfo.vue
javascript
<template>
  <div class="infos">
    {" "}
    // 根节点
    <h2>姓名: {{ name }}</h2>
    <h2>年龄: {{ age }}</h2>
    <h2>身高: {{ height }}</h2>
  </div>
</template>
禁用 Attribute 继承和多根节点
如果我们不希望组件的根元素继承 attribute,可以在组件中设置 inheritAttrs: false:
禁用 attribute 继承的常见情况是需要将 attribute 应用于根元素之外的其他元素;
我们可以通过 $attrs 来访问所有的 非 props 的 attribute;
javascript
<template>
  <div class="infos">
    <h2 :class="$attrs.class">姓名: {{ name }}</h2>
    <h2>年龄: {{ age }}</h2>
    <h2>身高: {{ height }}</h2>

    <h2>Message: {{ showMessage }}</h2>
  </div>
</template>

<script>
  export default {
    inheritAttrs: false,

    // 作用: 接收父组件传递过来的属性
    // 1.props数组语法
    // 弊端: 1> 不能对类型进行验证 2.没有默认值的
    // props: ["name", "age", "height"]

    // 2.props对象语法(必须掌握)
    props: {
      name: {
        type: String,
        default: "我是默认name"
      },
      age: {
        type: Number,
        required: true,
        default: 0
      },
      height: {
        type: Number,
        default: 2
      },
      // 重要的原则: 对象类型写默认值时, 需要编写default的函数, 函数返回默认值
      friend: {
        type: Object,
        default() {
          return { name: "james" }
        }
      },
      hobbies: {
        type: Array,
        default: () => ["篮球", "rap", "唱跳"]
      },
      showMessage: {
        type: String,
        default: "我是showMessage"
      }
    }
  }
</script>

<style scoped>
</style>
多个根节点的 attribute
多个根节点的 attribute 如果没有显示的绑定,那么会报警告,我们必须手动的指定要绑定到哪一个属性上:
javascript
<template>
  // 这里有2个根节点,infos和others
  <div class="infos">
    <h2 :class="$attrs.class">姓名: {{ name }}</h2>
    <h2>年龄: {{ age }}</h2>
    <h2>身高: {{ height }}</h2>

    <h2>Message: {{ showMessage }}</h2>
  </div>

  // 多个根节点,必须明确指定绑定到哪个根节点
  <div class="others" v-bind="$attrs"></div>
</template>
子组件传递给父组件
什么情况下子组件需要传递内容到父组件呢?
当子组件有一些事件发生的时候,比如在组件中发生了点击,父组件需要切换内容;
子组件有一些内容想要传递给父组件的时候;
我们如何完成上面的操作呢?
首先,我们需要在子组件中定义好在某些情况下触发的事件名称;
其次,在父组件中以 v-on 的方式传入要监听的事件名称,并且绑定到对应的方法中;
最后,在子组件中发生某个事件的时候,根据事件名称触发对应的事件;
App.vue
javascript
<template>
  <div class="app">
    <h2>当前计数: {{ counter }}</h2>

    <!-- 1.自定义add-counter, 并且监听内部的add事件 -->
    <add-counter @add="addBtnClick"></add-counter>
    <add-counter @add="addBtnClick"></add-counter>

    <!-- 2.自定义sub-counter, 并且监听内部的sub事件 -->
    <sub-counter @sub="subBtnClick"></sub-counter>
  </div>
</template>

<script>
  import AddCounter from './AddCounter.vue'
  import SubCounter from './SubCounter.vue'

  export default {
    components: {
      AddCounter,
      SubCounter
    },
    data() {
      return {
        counter: 0
      }
    },
    methods: {
      addBtnClick(count) {
        this.counter += count
      },
      subBtnClick(count) {
        this.counter -= count
      }
    }
  }
</script>

<style scoped>
</style>
AddCounter.vue
javascript
<template>
  <div class="add">
    <button @click="btnClick(1)">+1</button>
    <button @click="btnClick(5)">+5</button>
    <button @click="btnClick(10)">+10</button>
  </div>
</template>

<script>
  export default {
    // 1.emits数组语法
    emits: ["add"],
    // 2.emmits对象语法
    // 在vue3当中,我们可以对传递的参数进行验证:
    // emits: {
    //   add: function(count) {
    //     if (count <= 10) {
    //       return true
    //     }
    //     return false // 传100会返回false,不过依然会传递给父组件,但是会给出一些警告
    //   }
    // },
    methods: {
      btnClick(count) {
        console.log("btnClick:", count)
        // 让子组件发出去一个自定义事件
        // 第一个参数自定义的事件名称
        // 第二个参数是传递的参数
        this.$emit("add", 100)
      }
    }
  }
</script>

<style scoped>
</style>
SubCounter.vue
javascript
<template>
  <div class="sub">
    <button @click="btnClick(1)">-1</button>
    <button @click="btnClick(5)">-5</button>
    <button @click="btnClick(10)">-10</button>
  </div>
</template>

<script>
  export default {
    methods: {
      btnClick(count) {
        this.$emit("sub", count)
      }
    }
  }
</script>

<style scoped>
</style>
组件间通信案例练习

App.vue
javascript
<template>
  <div class="app">
    <!-- 1.tab-control -->
    <tab-control :titles="['衣服', '鞋子', '裤子']"
                 @tab-item-click="tabItemClick"/>

    <!-- <tab-control :titles="['流行', '最新', '优选']"/> -->

    <!-- 2.展示内容 -->
    <h1>{{ pageContents[currentIndex] }}</h1>
  </div>
</template>

<script>
  import TabControl from './TabControl.vue'

  export default {
    components: {
      TabControl
    },
    data() {
      return {
        pageContents: [ "衣服列表", "鞋子列表", "裤子列表" ],
        currentIndex: 0
      }
    },
    methods: {
      tabItemClick(index) {
        console.log("app:", index)
        this.currentIndex = index
      }
    }
  }
</script>

<style scoped>
</style>
TabControl.vue
javascript
<template>
  <div class="tab-control">
    <template v-for="(item, index) in titles" :key="item">
      <div class="tab-control-item"
           :class="{ active: index === currentIndex }"
           @click="itemClick(index)">
        <span>{{ item }}</span>
      </div>
    </template>
  </div>
</template>

<script>
  export default {
    props: {
      titles: {
        type: Array,
        default: () => []
      }
    },
    data() {
      return {
        currentIndex: 0
      }
    },
    emits: ["tabItemClick"],
    methods: {
      itemClick(index) {
        this.currentIndex = index
        this.$emit("tabItemClick", index)
      }
    }
  }
</script>

<style scoped>
  .tab-control {
    display: flex;
    height: 44px;
    line-height: 44px;
    text-align: center;
  }

  .tab-control-item {
    flex: 1;
  }

  .tab-control-item.active {
    color: red;
    font-weight: 700;
  }

  .tab-control-item.active span {
    border-bottom: 3px solid red;
    padding: 8px;
  }
</style>