Appearance
认识自定义指令
在 Vue 的模板语法中我们学习过各种各样的指令:v-show、v-for、v-model 等等,除了使用这些指令之外,Vue 也允许我们来
自定义自己的指令。
注意:在 Vue 中,代码的复用和抽象主要还是通过组件;
通常在某些情况下,你需要对 DOM 元素进行底层操作,这个时候就会用到自定义指令;
自定义指令分为两种:
自定义局部指令:组件中通过 directives 选项,只能在当前组件中使用;
自定义全局指令:app 的 directive 方法,可以在任意组件中被使用;
比如我们来做一个非常简单的案例:当某个元素挂载完成后可以自定获取焦点
实现方式一:如果我们使用默认的实现方式;
实现方式二:自定义一个 v-focus 的局部指令;
实现方式三:自定义一个 v-focus 的全局指令;
实现方式一:聚焦的默认实现
我们想进入一个页面,就让这个页面的输入框自动获取焦点。可以自定义一个 hook 来实现,但是每个组件内使用,还是需要导入再使用,有没有更简便的方法呢?答案是使用自定义指令。
javascript
<template>
  <div class="app">
    <input type="text" ref="inputRef">
  </div>
</template>

<script setup>

// 1.方式一: 定义ref绑定到input中, 调用focus
import useInput from "./hooks/useInput"
const { inputRef } = useInput()
</script>

<style scoped>

</style>
hooks/useInput.js
javascript
import { ref, onMounted } from "vue";

export default function useInput() {
  const inputRef = ref();

  onMounted(() => {
    inputRef.value?.focus();
  });

  return { inputRef };
}
实现方式二:局部自定义指令
实现方式二:自定义一个 v-focus 的局部指令
这个自定义指令实现非常简单,我们只需要在组件选项中使用 directives 即可;
它是一个对象,在对象中编写我们自定义指令的名称(注意:这里不需要加 v-);
自定义指令有一个生命周期,是在组件挂载后调用的 mounted,我们可以在其中完成操作;
javascript
<template>
  <div class="app">
    <!-- <input type="text" ref="inputRef"> -->
    <input type="text" v-focus>
  </div>
</template>

<script>
  // Option API 自定义指令的写法
  export default {
    directives: {
      focus: {
        // 生命周期的函数(自定义指令)
        mounted(el) {
          // console.log("v-focus应用的元素被挂载了", el) // el就是加自定义指令的元素
          el?.focus()
        }
      }
    }
  }

</script>

<script setup>

// 1.方式一: 定义ref绑定到input中, 调用focus
// import useInput from "./hooks/useInput"
// const { inputRef } = useInput()


// 2.方式二: 自定义指令(局部指令) Composition API自定义指令的写法,必须以v开头的驼峰式写法
const vFocus = {
  // 生命周期的函数(自定义指令)
  mounted(el) {
    // console.log("v-focus应用的元素被挂载了", el)
    el?.focus()
  }
}

</script>

<style scoped>

</style>
实现方式三:自定义全局指令
自定义一个全局的 v-focus 指令可以让我们在任何地方直接使用
在 main.js 中自定义全局指令
javascript
import { createApp } from "vue";

const app = createApp(App);
app.directive("focus", {
  // 生命周期的函数(自定义指令)
  mounted(el) {
    // console.log("v-focus应用的元素被挂载了", el)
    el?.focus();
  },
});

app.mount("#app");
但是在开发中可能自定义指令特别的多,那么如果把代码都放到 main.js 就不合适了,我们可以在 src 目录下建一个 directives 文件夹专门用来处理自定义指令。
directives/focus.js
javascript
export default function directiveFocus(app) {
  app.directive("focus", {
    // 生命周期的函数(自定义指令)
    mounted(el) {
      // console.log("v-focus应用的元素被挂载了", el)
      el?.focus();
    },
  });
}
有个统一暴露的出口,directives/index.js
javascript
import directiveFocus from "./focus";

export default function useDirectives(app) {
  directiveFocus(app);
}
main.js
javascript
import { createApp } from "vue";

import useDirectives from "./01_自定义指令/directives/index";

const app = createApp(App);
useDirectives(app);
app.mount("#app");
指令的生命周期
一个指令定义的对象,Vue 提供了如下的几个钩子函数:
created:在绑定元素的 attribute 或事件监听器被应用之前调用;
beforeMount:当指令第一次绑定到元素并且在挂载父组件之前调用;
mounted:在绑定元素的父组件被挂载后调用;
beforeUpdate:在更新包含组件的 VNode 之前调用;
updated:在包含组件的 VNode 及其子组件的 VNode 更新后调用;
beforeUnmount:在卸载绑定元素的父组件之前调用;
unmounted:当指令与元素解除绑定且父组件已卸载时,只调用一次;
javascript
<template>
  <div class="app">
    <button @click="counter++">+1</button>
    <button @click="showTitle = false">隐藏</button>
    <h2 v-if="showTitle" class="title" v-why>当前计数: {{ counter }}</h2>
  </div>
</template>

<script setup>
import { ref } from 'vue';


const counter = ref(0)
const showTitle = ref(true)

const vWhy = {
  // 页面创建的时候会调用 created beforeMount mounted
  created() {
    console.log("created")
  },
  beforeMount() {
    console.log("beforeMount")
  },
  mounted() {
    console.log("mounted")
  },
  // 点击+1按钮会触发 beforeUpdate updated
  beforeUpdate() {
    console.log("beforeUpdate")
  },
  updated() {
    console.log("updated")
  },
  // 点击隐藏按钮会触发 beforeUnmount unmounted
  beforeUnmount() {
    console.log("beforeUnmount")
  },
  unmounted() {
    console.log("unmounted")
  }
}

</script>

<style scoped>

</style>
指令的参数和修饰符
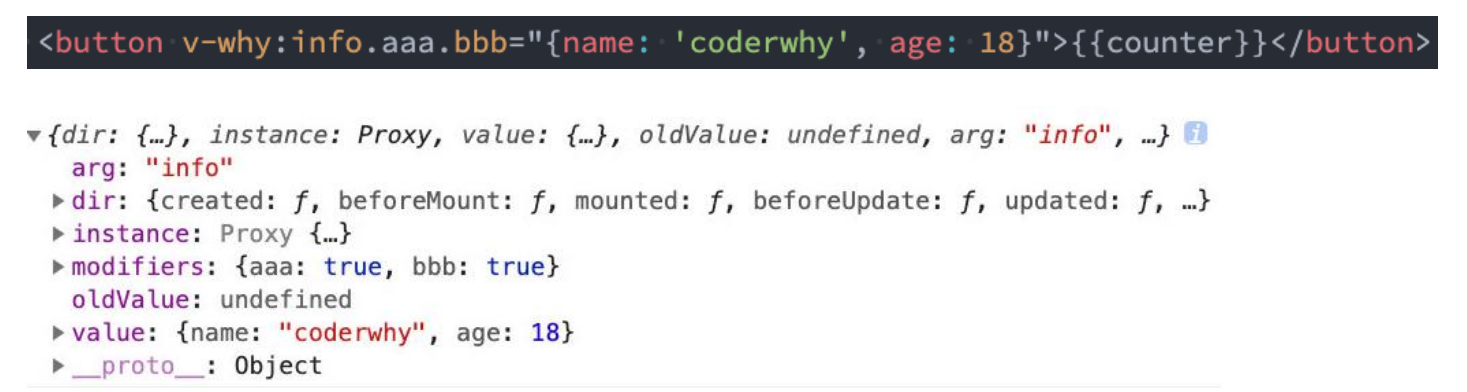
如果我们指令需要接受一些参数或者修饰符应该如何操作呢?
info 是参数的名称;
aaa 和 bbb 是修饰符的名称;
后面是传入的具体的值;
在我们的生命周期中,我们可以通过 bindings 获取到对应的内容:
javascript
<template>
  <div class="app">
    <!-- 1.参数-修饰符-值 kobe是参数名,abc和cba都是修饰符,message是传入的值-->
    <h2 v-why:kobe.abc.cba="message">哈哈哈哈</h2>
  </div>
</template>

<script setup>
    const message = '你好啊, 李银河'
    const vWhy = {
      mounted(el, bindings) {
        console.log(bindings)
        el.textContent = bindings.value // 刷新页面会将 哈哈哈哈 替换为 你好啊, 李银河
      }
    }

</script>

<style scoped>

</style>
我们来实现一个给价格加符合的自定义指令,比如 100 会变成 ¥100
directives/unit.js
javascript
export default function directiveUnit(app) {
  app.directive("unit", {
    mounted(el, bindings) {
      const defaultText = el.textContent;
      let unit = bindings.value;
      if (!unit) {
        unit = "¥";
      }
      el.textContent = unit + defaultText;
    },
  });
}
directives/index.js
javascript
import directiveFocus from "./focus";
import directiveUnit from "./unit";

export default function useDirectives(app) {
  directiveFocus(app);
  directiveUnit(app);
}
时间格式化指令
javascript
import dayjs from "dayjs";

export default function directiveFtime(app) {
  app.directive("ftime", {
    mounted(el, bindings) {
      // 1.获取时间, 并且转化成毫秒
      let timestamp = el.textContent;
      if (timestamp.length === 10) {
        timestamp = timestamp * 1000;
      }

      timestamp = Number(timestamp);

      // 2.获取传入的参数
      let value = bindings.value;
      if (!value) {
        value = "YYYY-MM-DD HH:mm:ss";
      }

      // 3.对时间进行格式化
      const formatTime = dayjs(timestamp).format(value);
      el.textContent = formatTime;
    },
  });
}
javascript
<template>
  <div class="app">
    <h2 v-ftime="'YYYY/MM/DD'">{{ timestamp }}</h2>
    <h2 v-ftime>{{ 1551111166666 }}</h2>
  </div>
</template>

<script setup>

const timestamp = 1231355453

</script>

<style scoped>

</style>
认识 Teleport
在组件化开发中,我们封装一个组件 A,在另外一个组件 B 中使用:
那么组件 A 中 template 的元素,会被挂载到组件 B 中 template 的某个位置;
最终我们的应用程序会形成一颗 DOM 树结构;
但是某些情况下,我们希望组件不是挂载在这个组件树上的,可能是移动到 Vue app 之外的其他位置:
比如移动到 body 元素上,或者我们有其他的 div#app 之外的元素上;
这个时候我们就可以通过 teleport 来完成;
Teleport 是什么呢?
它是一个 Vue 提供的内置组件,类似于 react 的 Portals;
teleport 翻译过来是心灵传输、远距离运输的意思;
它有两个属性:
to:指定将其中的内容移动到的目标元素,可以使用选择器;
disabled:是否禁用 teleport 的功能;
本来 hello-world 是会被挂载到.content 里面的,但是因为使用了 teleport 就会被挂载到 body 中
javascript
<template>
  <div class="app">
    <div class="hello">
      <p class="content">
        <teleport to="body">
          <hello-world/>
        </teleport>
      </p>
    </div>
  </div>
</template>

<script setup>

import HelloWorld from "./HelloWorld.vue"

</script>

<style scoped>

</style>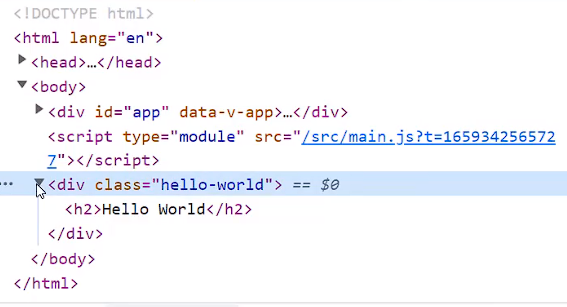
除了可以挂载到 body 中,可以挂载到 abc 中,在 index.html 中加一个 id 为 abc 的 div 元素
index.html
javascript
<!DOCTYPE html>
<html lang="en">
  <head>
    <meta charset="UTF-8" />
    <link rel="icon" href="/favicon.ico" />
    <meta name="viewport" content="width=device-width, initial-scale=1.0" />
    <title>Vite App</title>
    <style>
      #abc {
        border: 1px solid orange;
      }
    </style>
  </head>
  <body>
    <div id="app"></div>

    <div id="abc"></div>

    <script type="module" src="/src/main.js"></script>
  </body>
</html>
javascript
<template>
  <div class="app">
    <div class="hello">
      <p class="content">
        <teleport to="#abc">
          <hello-world/>
        </teleport>
      </p>
    </div>
  </div>
</template>

<script setup>

import HelloWorld from "./HelloWorld.vue"

</script>

<style scoped>

</style>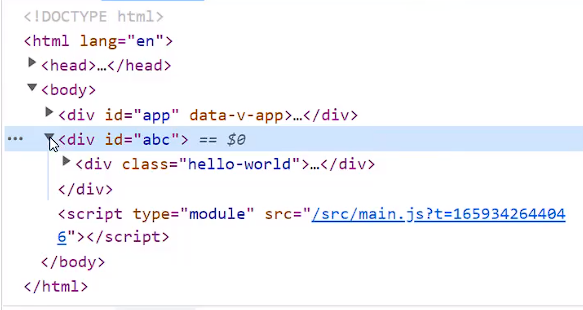
多个 teleport
如果我们将多个 teleport 应用到同一个目标上(to 的值相同),那么这些目标会进行合并
javascript
<template>
  <div class="app">
    <div class="hello">
      <p class="content">
        <teleport to="#abc">
          <hello-world/>
        </teleport>
      </p>
    </div>

    <div class="content">
      <teleport to="#abc">
        <h2>哈哈哈哈哈</h2>
      </teleport>
    </div>
  </div>
</template>

<script setup>

import HelloWorld from "./HelloWorld.vue"

</script>

<style scoped>

</style>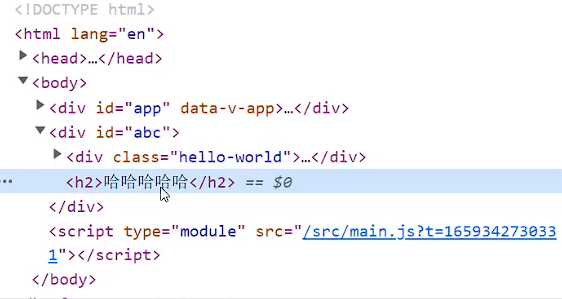
异步组件和 Suspense
注意:目前(2022-08-01)Suspense 显示的是一个实验性的特性,API 随时可能会修改。
Suspense 是一个内置的全局组件,该组件有两个插槽:
default:如果 default 可以显示,那么显示 default 的内容;
fallback:如果 default 无法显示,那么会显示 fallback 插槽的内容;
javascript
<template>
  <div class="app">
    <suspense>
      <template #default>
        <async-home/>
      </template>
      <template #fallback>
        <h2>Loading</h2>
      </template>
    </suspense>
  </div>
</template>

<script setup>
import { defineAsyncComponent } from 'vue';

const AsyncHome = defineAsyncComponent(() => import("./AsyncHome.vue"))

</script>

<style scoped>

</style>
认识 Vue 插件
通常我们向 Vue 全局添加一些功能时,会采用插件的模式,它有两种编写方式:
对象类型:一个对象,但是必须包含一个 install 的函数,该函数会在安装插件时执行;
函数类型:一个 function,这个函数会在安装插件时自动执行;
插件可以完成的功能没有限制,比如下面的几种都是可以的:
添加全局方法或者 property,通过把它们添加到 config.globalProperties 上实现;
添加全局资源:指令/过滤器/过渡等;
通过全局 mixin 来添加一些组件选项;
一个库,提供自己的 API,同时提供上面提到的一个或多个功能;
router/index.js
javascript
import { createRouter } from "vue-router";

// createRouter函数返回的对象里面有个install方法
const router = createRouter({
  // history:
});

export default router;
javascript
// 安装插件
// 方式一: 传入对象的情况 vue-router导出的router本质上是一个对象,内部有个install方法
app.use({
  install: function (app) {
    console.log("传入对象的install被执行:", app);
  },
});

// 方式二: 传入函数的情况
app.use(function (app) {
  console.log("传入函数被执行:", app);
});
那么,现在就可以使用插件的方式来自定义指令,写出来的代码会更加的优雅
directives/index.js
javascript
import directiveFocus from "./focus";
import directiveUnit from "./unit";
import directiveFtime from "./ftime";

// export default function useDirectives(app) {
//   directiveFocus(app)
//   directiveUnit(app)
//   directiveFtime(app)
// }

export default function directives(app) {
  directiveFocus(app);
  directiveUnit(app);
  directiveFtime(app);
}
main.js
javascript
import { createApp } from "vue";
import directives from "./01_自定义指令/directives/index"; // directives是个函数,使用插件会自动执行

// import router from "./router"

// 自定义指令的方式一:
// const app = createApp(App)
// // useDirectives(app)
// directives(app)
// app.mount('#app')

// 自定义指令的方式二:使用插件
createApp(App).use(directives).mount("#app");
认识 h 函数
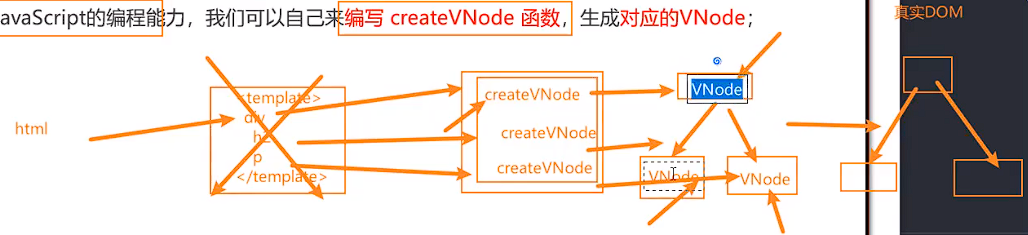
Vue 推荐在绝大数情况下使用模板来创建你的 HTML,然后一些特殊的场景,你真的需要JavaScript 的完全编程的能力,这个时
候你可以使用 渲染函数 ,它比模板更接近编译器;
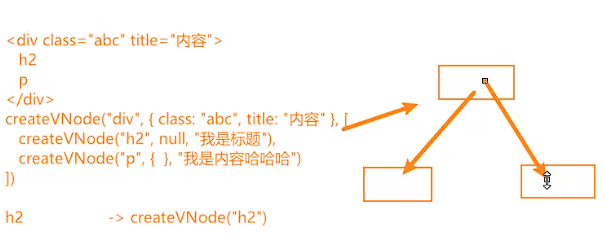
前面我们讲解过 VNode 和 VDOM 的概念:
Vue 在生成真实的 DOM 之前,会将我们的节点转换成 VNode,而 VNode 组合在一起形成一颗树结构,就是虚拟 DOM
(VDOM);
事实上,我们之前编写的 template 中的 HTML 最终也是使用渲染函数生成对应的 VNode;
那么,如果你想充分的利用 JavaScript 的编程能力,我们可以自己来编写 createVNode 函数,生成对应的 VNode;
那么我们应该怎么来做呢?使用 h()函数:
h() 函数是一个用于创建 vnode 的一个函数;
其实更准确的命名是 createVNode() 函数,但是为了简便在 Vue 将之简化为 h() 函数;
h 函数 如何使用呢?
h()函数 如何使用呢?它接受三个参数:
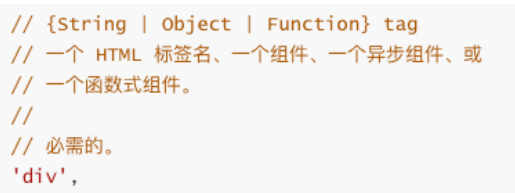
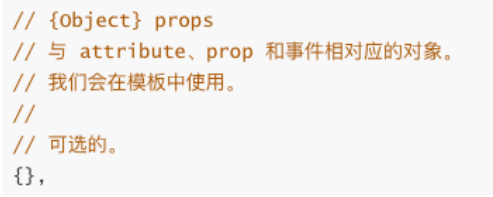
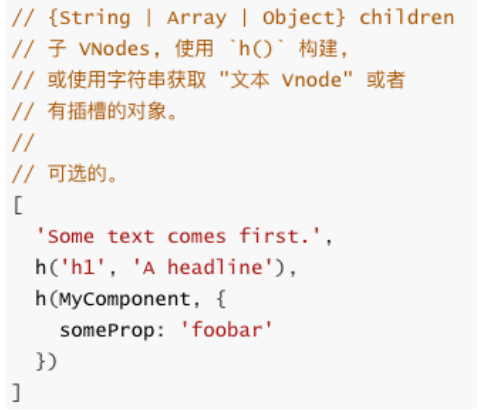
注意事项:
如果没有 props,那么通常可以将 children 作为第二个参数传入;
如果会产生歧义,可以将 null 作为第二个参数传入,将 children 作为第三个参数传入;
h 函数的基本使用
h 函数可以在两个地方使用:
render 函数选项中;
javascript
<script>
  import { h } from 'vue'

  export default {
    render() {
      return h("div", { className: "app" }, [
        h("h2", { className: "title" }, "我是标题"),
        h("p", { className: "content" }, "我是内容, 哈哈哈"),
      ])
    }
  }
</script>

<style scoped>

</style>
setup 函数选项中(setup 本身需要是一个函数类型,函数再返回 h 函数创建的 VNode);
javascript
<script>
  import { h, ref } from 'vue'
  import Home from "./Home.vue"

  export default {
    setup() {
      const counter = ref(0)

      const increment = () => {
        counter.value++
      }
      const decrement = () => {
        counter.value--
      }

      return () => h("div", { className: "app" }, [
        h("h2", null, `当前计数: ${counter.value}`),
        h("button", { onClick: increment }, "+1"),
        h("button", { onClick: decrement }, "-1"),
        h(Home)
      ])
    }
  }
</script>

<style scoped>

</style>
javascript
<template>
  <render/>
</template>

<script setup>

import { ref, h } from 'vue';
import Home from './Home.vue'

const counter = ref(0)

const increment = () => {
  counter.value++
}
const decrement = () => {
  counter.value--
}

const render = () => h("div", { className: "app" }, [
  h("h2", null, `当前计数: ${counter.value}`),
  h("button", { onClick: increment }, "+1"),
  h("button", { onClick: decrement }, "-1"),
  h(Home)
])

</script>

<style scoped>

</style>
h 函数计数器案例
javascript
<script>
  import { h } from 'vue'
  import Home from "./Home.vue"

  export default {
    data() {
      return {
        counter: 0
      }
    },

    render() {
      return h("div", { className: "app" }, [
        h("h2", null, `当前计数: ${this.counter}`),
        h("button", { onClick: this.increment }, "+1"),
        h("button", { onClick: this.decrement }, "-1"),
        h(Home) // 也可以渲染一个组件
      ])
    },
    methods: {
      increment() {
        this.counter++
      },
      decrement() {
        this.counter--
      }
    }
  }
</script>

<style scoped>

</style>
jsx 的 babel 配置
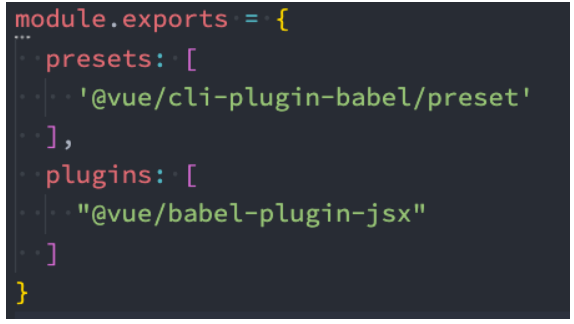
如果我们希望在项目中使用 jsx,那么我们需要添加对 jsx 的支持:
jsx 我们通常会通过 Babel 来进行转换(React 编写的 jsx 就是通过 babel 转换的);
对于 Vue 来说,我们只需要在 Babel 中配置对应的插件即可;
安装Babel 支持 Vue 的 jsx 插件:
javascript
npm install @vue/babel-plugin-jsx -D在babel.config.js 配置文件中配置插件:
如果是 Vite 环境,需要安装插件:
javascript
npm install @vitejs/plugin-vue-jsx -Dvite.config.js
javascript
import { fileURLToPath, URL } from "node:url";

import { defineConfig } from "vite";
import vue from "@vitejs/plugin-vue";
import jsx from "@vitejs/plugin-vue-jsx"; // 引入插件

// https://vitejs.dev/config/
export default defineConfig({
  plugins: [
    vue(),
    jsx(), // 使用插件
  ],
  resolve: {
    alias: {
      "@": fileURLToPath(new URL("./src", import.meta.url)),
    },
  },
});
jsx 语法基本使用
javascript
<script lang="jsx">
  export default {
    render() {
      return (
        <div class="app">
          <h2>我是标题</h2>
          <p>我是内容, 哈哈哈</p>
        </div>
      )
    }
  }
</script>

<style lang="less" scoped>

</style>
jsx 语法实现计数器
javascript
<script lang="jsx">
  import About from './About.vue'

  export default {
    data() {
      return {
        counter: 0
      }
    },

    render() {
      return (
        <div class="app">
          <h2>当前计数: { this.counter }</h2>
          <button onClick={ this.increment }>+1</button>
          <button onClick={ this.decrement }>-1</button>
          <About/>
        </div>
      )
    },
    methods: {
      increment() {
        this.counter++
      },
      decrement() {
        this.counter--
      }
    }
  }
</script>

<style lang="less" scoped>

</style>
在 Vue3 中使用 jsx
javascript
<script lang="jsx">
  import { ref } from 'vue'
  import About from './About.vue'

  export default {
    setup() {
      const counter = ref(0)

      const increment = () => {
        counter.value++
      }
      const decrement = () => {
        counter.value--
      }


      return () => (
        <div class="app">
          <h2>当前计数: { counter.value }</h2>
          <button onClick={ increment }>+1</button>
          <button onClick={ decrement }>-1</button>
          <About/>
        </div>
      )
    }
  }
</script>
javascript
<template>
  <jsx/>
</template>

<script lang="jsx" setup>
import { ref } from 'vue'
import About from "./About.vue"

const counter = ref(0)

const increment = () => {
  counter.value++
}
const decrement = () => {
  counter.value--
}

const jsx = () => (
  <div class="app">
    <h2>当前计数: { counter.value }</h2>
    <button onClick={ increment }>+1</button>
    <button onClick={ decrement }>-1</button>
    <About/>
  </div>
)
</script>

<style lang="less" scoped>

</style>